Deploying the Torrust Tracker Demo with the Torrust Tracker Deployer
Learn how we used the Torrust Tracker Deployer to deploy the Torrust Tracker Demo to Hetzner Cloud — a production-ready setup with HTTPS, MySQL, floating IPs, and Grafana monitoring — and what we discovered along the way.
Hello, Torrust community!
We recently deployed the Torrust Tracker Demo — a fully public, production Torrust Tracker instance — using the Torrust Tracker Deployer, our new tool for automating tracker deployments to virtual machines. Both the HTTP tracker (online since 4-3-2026) and the UDP tracker (online since 6-3-2026) are running and monitored on newTrackon.
We used this real deployment as an end-to-end test of the deployer itself. We found 11 bugs — all of which have been fixed ahead of the upcoming v0.1.0 release. This post documents the full experience: the step-by-step tutorial for deploying your own tracker, the manual post-provision steps the deployer does not yet automate, and a troubleshooting appendix for the problems most likely to trip up first-time deployers.
- Floating IPs — static IPs that can be reassigned to a new server without changing DNS records, allowing zero-downtime server replacements and resizes.
- Attached storage volume — a separate disk for all persistent data, making it easy to back up or migrate data independently of the VM.
- HTTP: https://http1.torrust-tracker-demo.com/announce
- UDP:
udp://udp1.torrust-tracker-demo.com:6969/announce
Background
Back in 2023 we published a manual deployment guide that walked through every step needed to get Torrust running on a Digital Ocean droplet. It worked, but it involved dozens of manual steps — SSH access, Nginx configuration, Let's Encrypt setup, tracker config files — things that get tedious when you need to recreate an environment or hand it off to someone else.
In late 2025 we announced the Torrust Tracker Deployer, a tool designed to reduce that entire process to a handful of commands. This post is the first real-world report of using it in production. All configuration used for the demo is published (with secrets masked) in the torrust-tracker-demo repository.
What We Deployed
The demo runs six services on a single Hetzner Cloud server, all behind a Caddy reverse proxy with automatic Let's Encrypt certificates:
| Service | Endpoint |
|---|---|
| HTTP Tracker 1 (public) | https://http1.torrust-tracker-demo.com/announce |
| HTTP Tracker 2 (private testing) | https://http2.torrust-tracker-demo.com/announce |
| UDP Tracker 1 (public) | udp://udp1.torrust-tracker-demo.com:6969/announce |
| UDP Tracker 2 (private testing) | udp://udp2.torrust-tracker-demo.com:6868/announce |
| REST API | https://api.torrust-tracker-demo.com |
| Grafana | https://grafana.torrust-tracker-demo.com |
We intentionally keep http2 and udp2 off all public tracker lists.
Once a tracker appears in public lists it receives a continuous stream of announces from BitTorrent
clients worldwide. Keeping those endpoints quiet reserves them as low-traffic endpoints for
manual testing and log analysis.
Key configuration decisions:
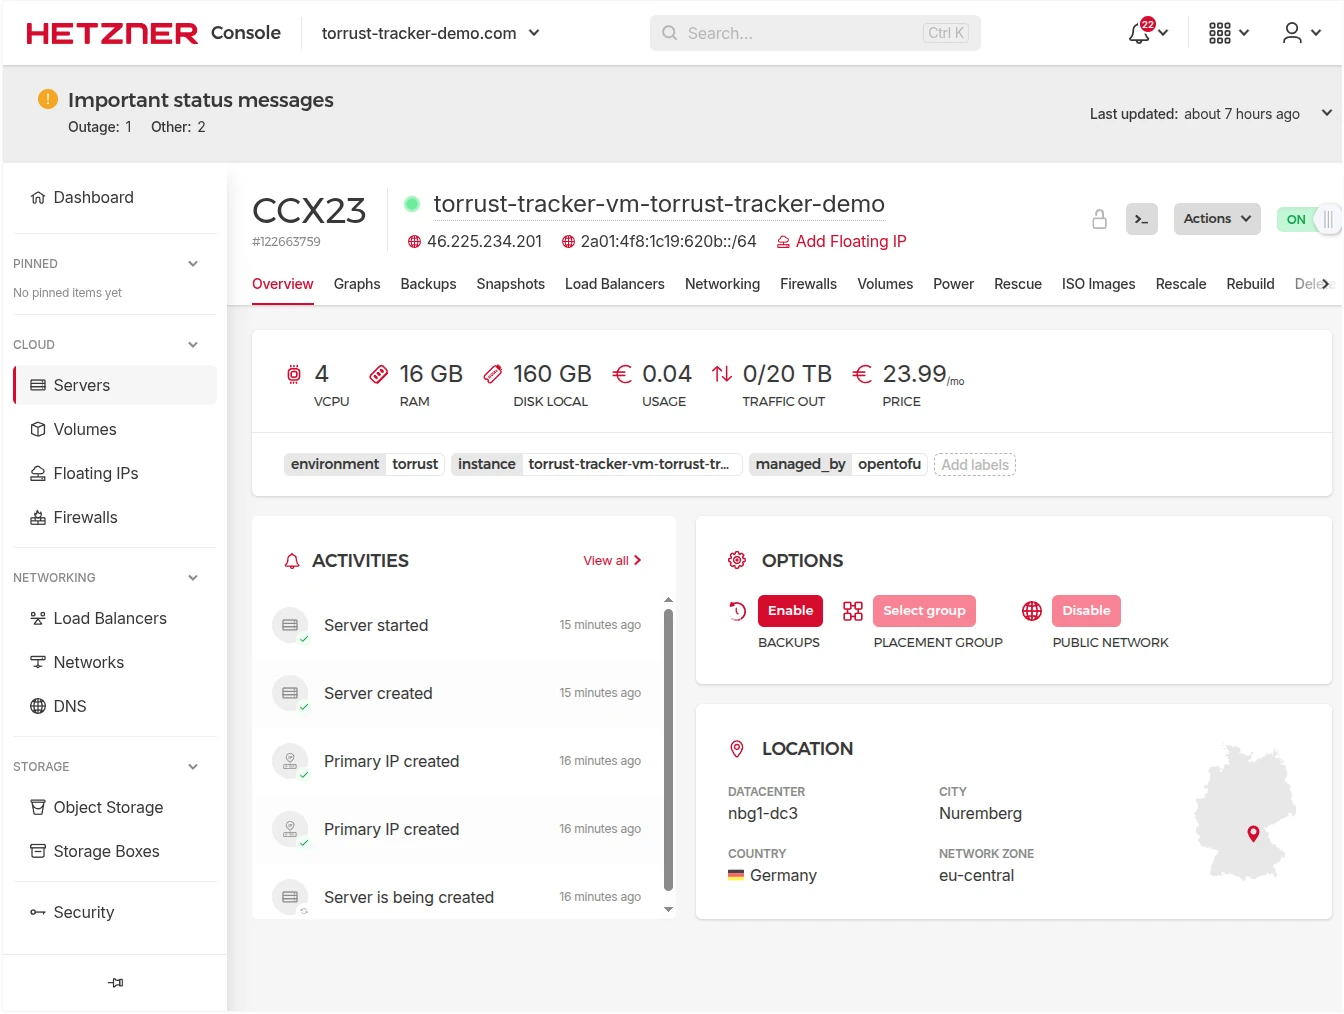
- Server: Hetzner Cloud
ccx23— 4 vCPU, 16 GB RAM, Nuremberg (nbg1) - OS: Ubuntu 24.04 LTS
- Database: MySQL (production-ready; SQLite is the dev default — see troubleshooting)
- HTTPS: Let's Encrypt production certificates via Caddy reverse proxy
- Monitoring: Prometheus + Grafana included out of the box
- Storage: Separate 50 GB Hetzner volume mounted at
/opt/torrust/storage - Backups: Daily automated backups at 03:00 UTC, 7-day retention
Prerequisites
Before running any deployer command, you need the following in place.
Hetzner Account and Project
- Sign up for Hetzner Cloud if you don't have an account.
- Create a new project in the Hetzner Console. We named ours
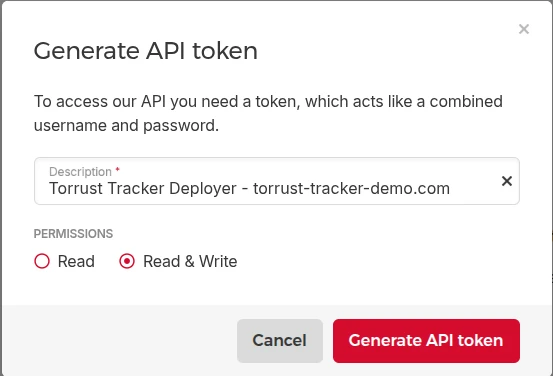
torrust-tracker-demo.com. - Generate an API token with Read & Write permissions: project → Security → API Tokens → Generate API Token. Copy it immediately — it won't be shown again.
Domain and DNS
- Register a domain and change its nameservers to Hetzner's:
helium.ns.hetzner.dehydrogen.ns.hetzner.comoxygen.ns.hetzner.com
- Create a DNS zone for your domain in the Hetzner Console under DNS.
SSH Key Pair
The deployer uses an SSH key pair to connect to the provisioned VM. Generate a dedicated temporary key without a passphrase — automation tools like OpenTofu and Ansible cannot prompt for one, and the deployer will fail silently if the key is passphrase-protected:
ssh-keygen -t ed25519 -C "torrust-tracker-deployer" \
  -f ~/.ssh/torrust_tracker_deployer_ed25519 -N ""
Tighten permissions on the private key:
chmod 600 ~/.ssh/torrust_tracker_deployer_ed25519- Never reuse it for anything other than this deployment — one key per deployment environment.
- Once deployment is complete, remove it from the Hetzner project (Console → Security → SSH Keys) and delete the local files.
- For ongoing server access after deployment, add a separate, passphrase-protected key manually.
- If you are using an AI agent (e.g. Claude Code) to run the deployer on your behalf, use a temporary key scoped to this deployment only — especially if you are using a hosted model rather than a local LLM, since the key material could be included in context sent to the model.
Deployer Tool
The deployer supports two modes. For most users, Docker is the recommended choice — no Rust, Ansible, or OpenTofu installation required:
# Pull the latest image
docker pull torrust/tracker-deployer:latest

# Verify it works
docker run --rm torrust/tracker-deployer:latest --help
The image bundles OpenTofu (for infrastructure provisioning), Ansible (for server configuration), and SSH. If you prefer to run from source, the repository's README covers the native setup.
Step-by-Step Deployment Tutorial
The deployer follows a strict linear lifecycle. Each command advances the environment to the next state, and commands can only be run in order:
create template → edit config → validate → create environment → provision → (manual post-provision steps) → configure → release → run → test
All commands below use Docker. Replace torrust-tracker-demo with your own environment
name throughout.
Step 1 — Generate the Config Template
Start by generating a starter config file for the Hetzner provider. This creates a JSON file with all required fields and sensible placeholders:
docker run --rm \
  -v $(pwd)/envs:/var/lib/torrust/deployer/envs \
  torrust/tracker-deployer:latest \
  create template --provider hetzner \
  /var/lib/torrust/deployer/envs/torrust-tracker-demo.json
Open the generated file and replace the placeholders. The key fields to fill in are:
| Placeholder | Value |
|---|---|
REPLACE_WITH_ENVIRONMENT_NAME | torrust-tracker-demo (or your chosen name) |
REPLACE_WITH_SSH_PRIVATE_KEY_ABSOLUTE_PATH | /home/deployer/.ssh/torrust_tracker_deployer_ed25519 (container path) |
REPLACE_WITH_SSH_PUBLIC_KEY_ABSOLUTE_PATH | /home/deployer/.ssh/torrust_tracker_deployer_ed25519.pub (container path) |
REPLACE_WITH_HETZNER_API_TOKEN | Your Hetzner API token (never commit this) |
/home/deployer/.ssh/...), not host
paths like /home/yourname/.ssh/.... The deployer mounts your ~/.ssh directory into the container at /home/deployer/.ssh/.
Using host paths will cause an immediate failure at provision time.Beyond filling in the placeholders, review these two settings before moving on — the template defaults are wrong for public production trackers:
- Bind addresses: The template defaults to
0.0.0.0(IPv4 only). For a public tracker, change all bind addresses to[::], which accepts both IPv4 and IPv6 on Linux. Only the internal health-check API should stay on127.0.0.1. - Database: The template silently selects SQLite. For any production deployment, change this to MySQL. See the troubleshooting note for details.
A minimal excerpt of the final config for the demo deployment looks like this:
{
  "environment": {
    "name": "torrust-tracker-demo",
    "instance_name": null
  },
  "ssh_credentials": {
    "private_key_path": "/home/deployer/.ssh/torrust_tracker_deployer_ed25519",
    "public_key_path": "/home/deployer/.ssh/torrust_tracker_deployer_ed25519.pub",
    "username": "torrust",
    "port": 22
  },
  "provider": {
    "provider": "hetzner",
    "api_token": "<HETZNER_API_TOKEN>",
    "server_type": "ccx23",
    "location": "nbg1",
    "image": "ubuntu-24.04"
  },
  "tracker": {
    "udp_trackers": [
      { "bind_address": "[::]:6969", "domain": "udp1.torrust-tracker-demo.com" },
      { "bind_address": "[::]:6868", "domain": "udp2.torrust-tracker-demo.com" }
    ],
    "http_trackers": [
      { "bind_address": "[::]:7070", "domain": "http1.torrust-tracker-demo.com" },
      { "bind_address": "[::]:7171", "domain": "http2.torrust-tracker-demo.com" }
    ],
    "http_api": {
      "bind_address": "[::]:1212",
      "domain": "api.torrust-tracker-demo.com"
    },
    "database": {
      "driver": "MySQL",
      "host": "mysql",
      "port": 3306,
      "name": "torrust_tracker",
      "username": "torrust",
      "password": "<TRACKER_DB_PASSWORD>"
    }
  }
}instance_name as null makes the deployer auto-generate the server name as torrust-tracker-vm-{env_name} — in our case torrust-tracker-vm-torrust-tracker-demo. You can set a custom name if
preferred.Step 2 — Validate the Config
Before creating the environment, validate the config file:
docker run --rm \
  -v $(pwd)/envs:/var/lib/torrust/deployer/envs \
  torrust/tracker-deployer:latest \
  validate --env-file /var/lib/torrust/deployer/envs/torrust-tracker-demo.json \
  --output-format json
The command validates file readability, JSON schema, and domain constraints (SSH key
paths, naming rules, ports, IPs, and required fields). With --output-format json, a valid config returns a JSON summary:
{
  "environment_name": "torrust-tracker-demo",
  "config_file": "envs/torrust-tracker-demo.json",
  "provider": "hetzner",
  "is_valid": true,
  "has_prometheus": true,
  "has_grafana": true,
  "has_https": true,
  "has_backup": true
}
Step 3 — Create the Environment
Once validated, create the environment with the deployer. This creates the local state directories:
docker run --rm \
  -v $(pwd)/data:/var/lib/torrust/deployer/data \
  -v $(pwd)/build:/var/lib/torrust/deployer/build \
  -v $(pwd)/envs:/var/lib/torrust/deployer/envs \
  torrust/tracker-deployer:latest \
  create environment --env-file /var/lib/torrust/deployer/envs/torrust-tracker-demo.json
The deployer creates data/torrust-tracker-demo/environment.json — the environment's
state file, managed exclusively by the deployer. Never edit this file manually.
Step 4 — Provision the Server
The provision command creates the Hetzner VM via OpenTofu (an open-source Terraform fork) and waits for
SSH to become available:
docker run --rm \
  -v $(pwd)/data:/var/lib/torrust/deployer/data \
  -v $(pwd)/build:/var/lib/torrust/deployer/build \
  -v $(pwd)/envs:/var/lib/torrust/deployer/envs \
  -v ~/.ssh:/home/deployer/.ssh:ro \
  torrust/tracker-deployer:latest \
  provision torrust-tracker-demo
This step creates the VM with an Ubuntu 24.04 base image (as with most cloud providers,
the OS is selected at creation time), injects your public SSH key via cloud-init, and
waits up to 300 seconds for SSH to respond and cloud-init to complete. On success it
reports the instance IP and transitions the environment state to Provisioned.
After provisioning, note the server's primary IP address from the output or the Hetzner Console. You will need this IP for the post-provision manual steps.
Step 5 — Post-Provision Manual Steps
The deployer does not yet automate the following steps. They must be completed manually
before running configure.
Provision and Assign Floating IPs
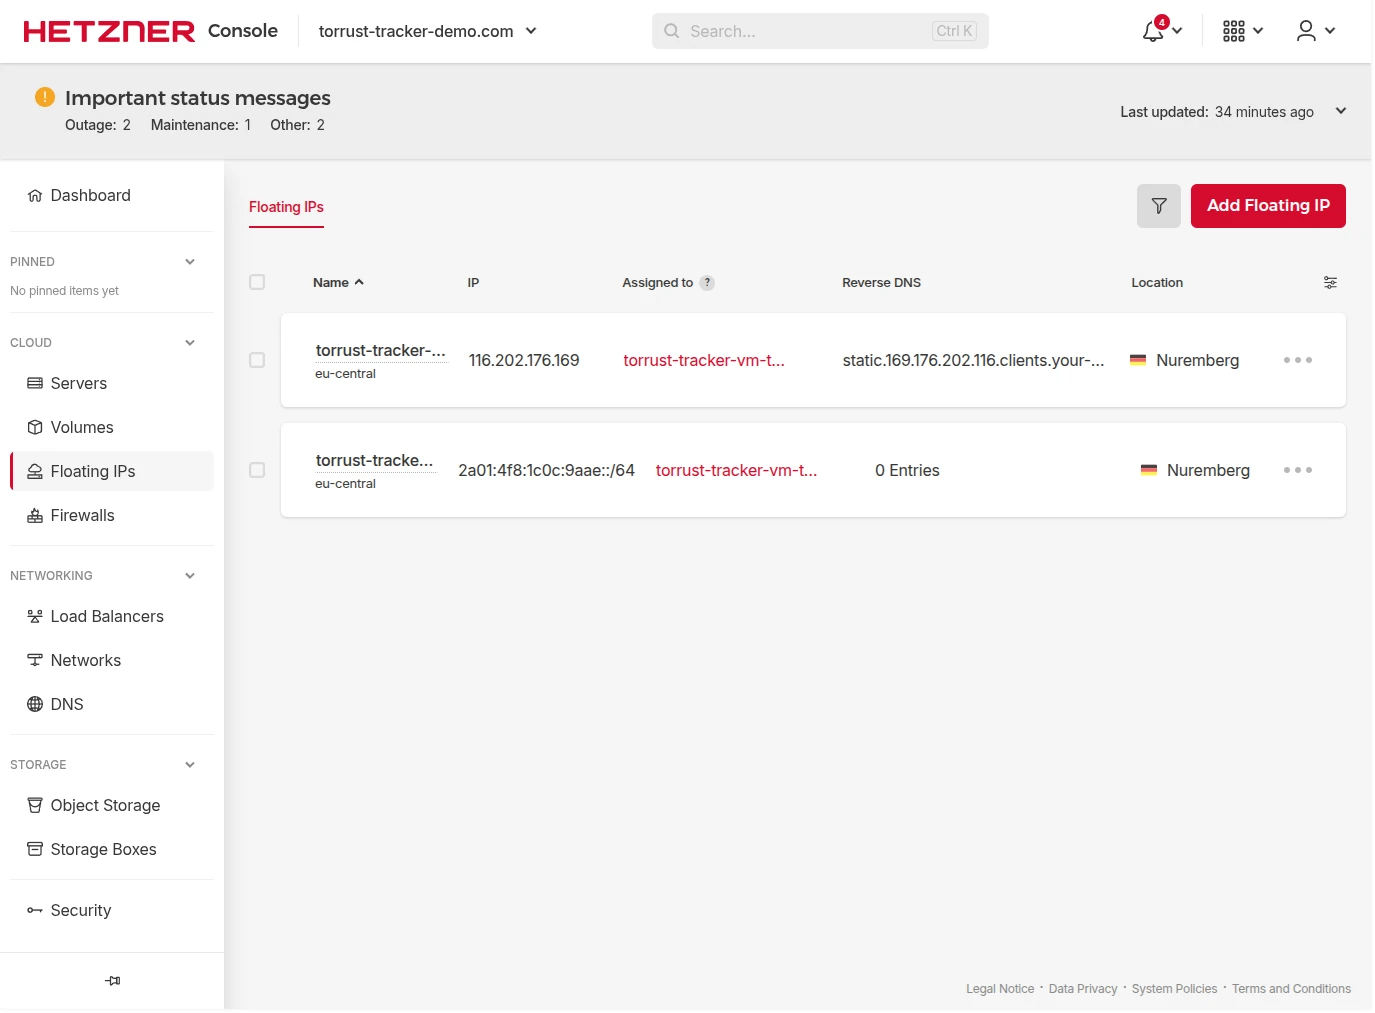
Hetzner floating IPs are static IPs that can be reassigned to a different server at any time. Using them means your DNS records never need to change even if you rebuild the server. We provisioned one IPv4 and one IPv6 floating IP per public service.
In the Hetzner Console → Networking → Floating IPs:
- Create a new IPv4 floating IP in the same datacenter as your server (
nbg1in our case). - Create a new IPv6 floating IP (
/64block) in the same datacenter. - Assign both floating IPs to the provisioned server.
After assigning, Hetzner updates their routing, but the VM itself still needs to know
about the new IPs. Configure them persistently using netplan. SSH into the server and
create /etc/netplan/60-floating-ip.yaml:
network:
  version: 2
  renderer: networkd
  ethernets:
    eth0:
      addresses:
        - 116.202.176.169/32   # your floating IPv4
        - 2a01:4f8:1c0c:9aae::1/64  # your floating IPv6
      routing-policy:
        - from: 116.202.176.169
          table: 100
        - from: 2a01:4f8:1c0c:9aae::1
          table: 200
      routes:
        - to: default
          via: 172.31.1.1
          table: 100
        - to: default
          via: fe80::1
          table: 200
Apply the configuration:
sudo netplan applyThe routing-policy entries ensure reply packets leave via the same floating IP they arrived on — this is essential for UDP tracker traffic, which uses asymmetric routing otherwise. See the troubleshooting section on IPv6 UDP for the full story.
docs/user-guide/providers/hetzner/post-deployment.md.Create DNS Records
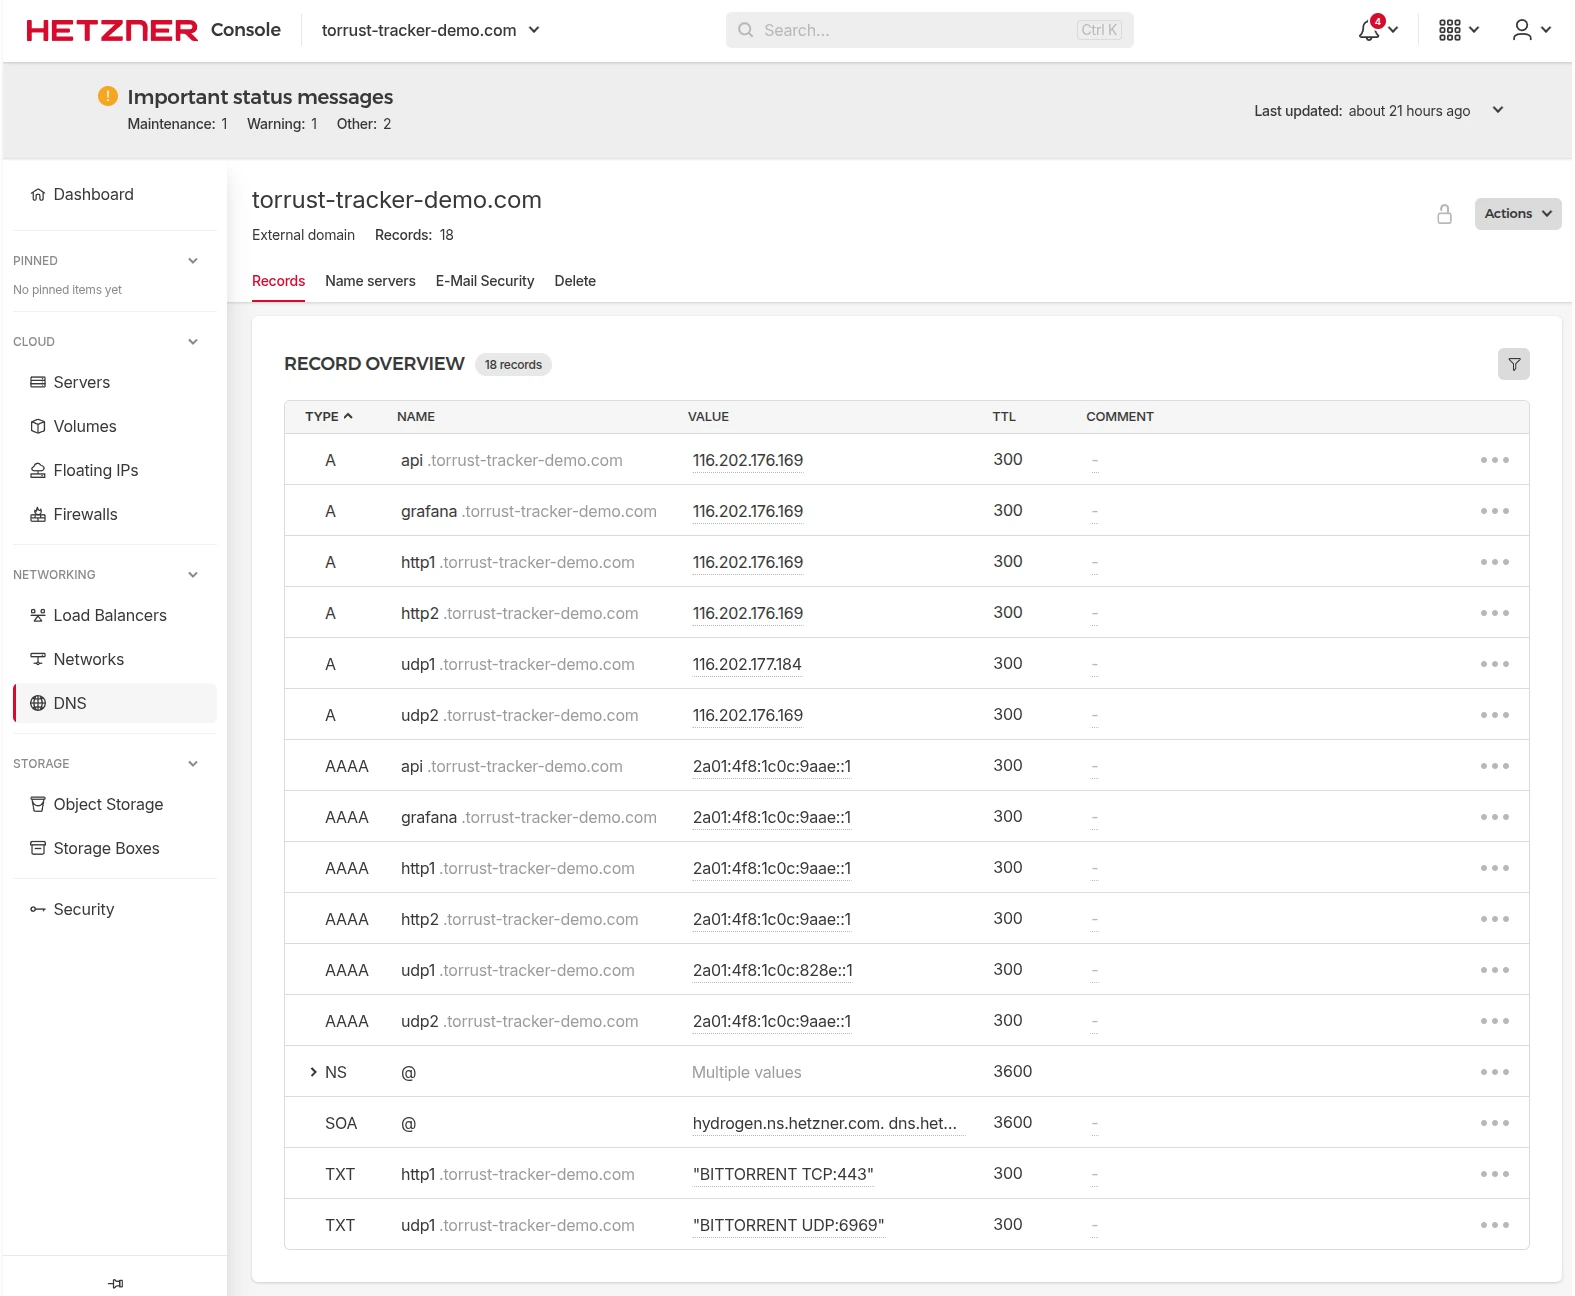
In the Hetzner DNS Console (or via API), create A and AAAA records for each subdomain pointing to your floating IPs:
| Subdomain | A (IPv4) | AAAA (IPv6) |
|---|---|---|
http1 | floating IPv4 | floating IPv6 |
http2 | floating IPv4 | floating IPv6 |
udp1 | floating IPv4 | floating IPv6 |
udp2 | floating IPv4 | floating IPv6 |
api | floating IPv4 | floating IPv6 |
grafana | floating IPv4 | floating IPv6 |
run. The configure command only installs system dependencies; the release command stages the application. It is only when run starts the services that Caddy
attempts to obtain Let's Encrypt certificates using DNS validation. If DNS has not propagated
by then, certificate issuance will fail and the services will not start with HTTPS.Create and Mount a Storage Volume
Torrust stores all persistent data (database, logs, Grafana state, Prometheus data,
backups) under /opt/torrust/storage/. Putting this on a separate Hetzner
volume means you can detach it and reattach it to a new server if the VM is ever recreated
— no data loss.
Create a 50 GB volume via the Hetzner Cloud API:
curl -s -X POST \
  -H "Authorization: Bearer $HCLOUD_TOKEN" \
  -H "Content-Type: application/json" \
  "https://api.hetzner.cloud/v1/volumes" \
  -d '{
    "name": "torrust-tracker-demo-storage",
    "size": 50,
    "location": "nbg1",
    "format": "ext4",
    "labels": {"project": "torrust-tracker-demo"}
  }'
Then attach the volume to the server (also via Hetzner API or Console), SSH in, and mount
it permanently by adding it to /etc/fstab:
# The volume device will appear as /dev/sdb (or /dev/disk/by-id/...)
sudo mkdir -p /opt/torrust/storage
echo '/dev/sdb /opt/torrust/storage ext4 discard,nofail,defaults 0 0' | sudo tee -a /etc/fstab
sudo mount -a
df -h /opt/torrust/storage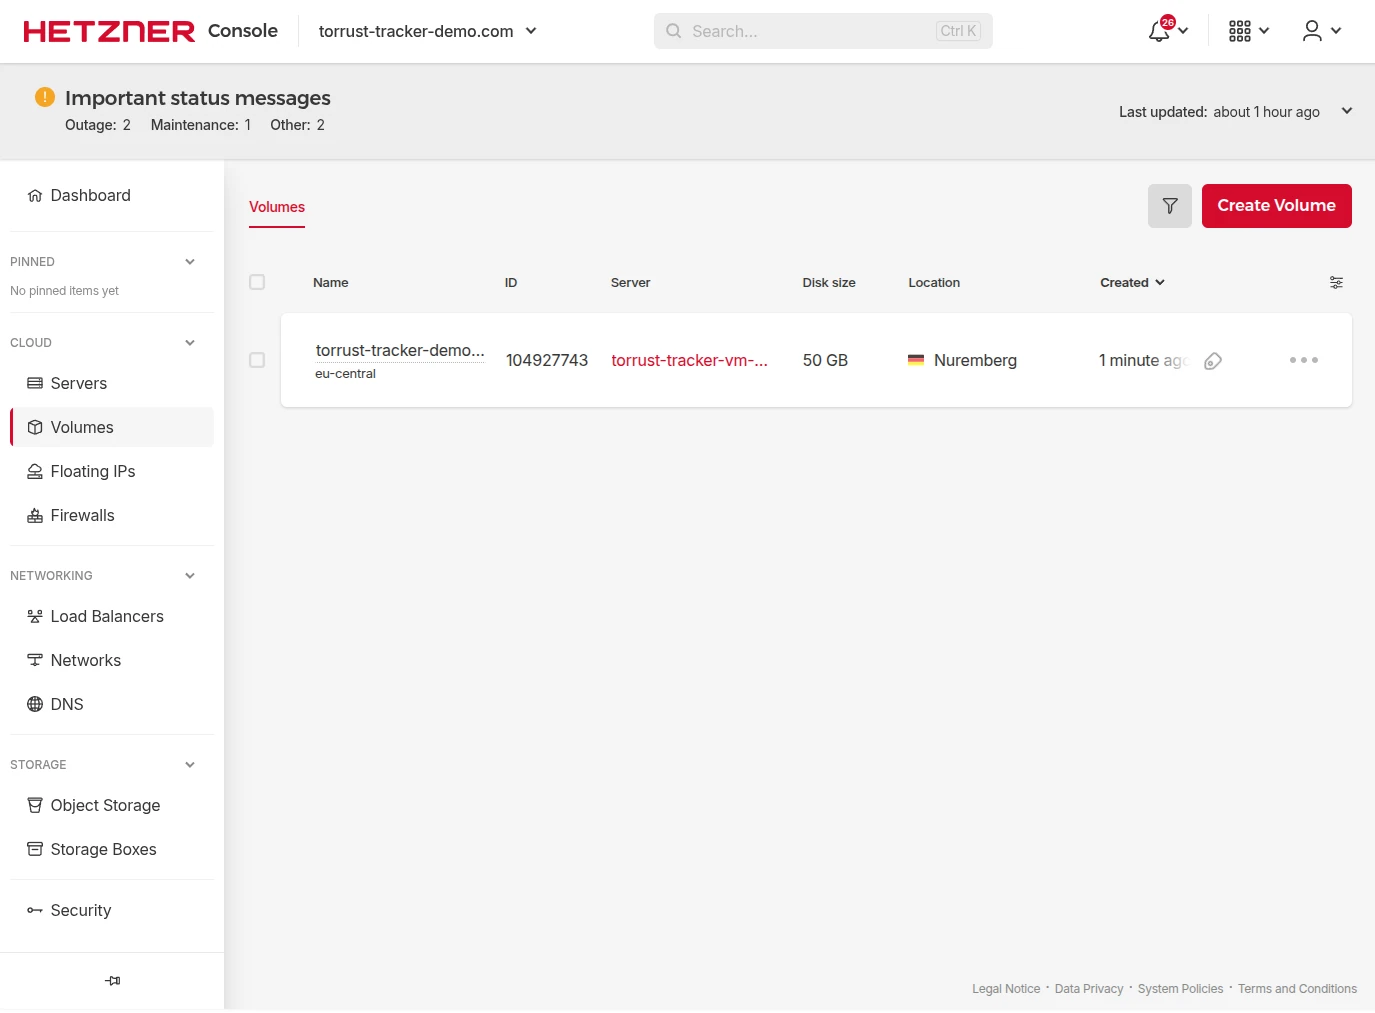
Enable Hetzner Server Backups
In the Hetzner Console → server → Backups, enable automated server backups. We configured daily backups at 03:00 UTC with 7-day retention. This can be done at any point after provisioning.
Step 6 — Configure the Server
The configure command runs Ansible over SSH to prepare the host: it installs Docker Engine and the Docker
Compose plugin, configures automatic security updates and UFW firewall rules, and adds the SSH
user to the docker group:
docker run --rm \
  -v $(pwd)/data:/var/lib/torrust/deployer/data \
  -v $(pwd)/build:/var/lib/torrust/deployer/build \
  -v $(pwd)/envs:/var/lib/torrust/deployer/envs \
  -v ~/.ssh:/home/deployer/.ssh:ro \
  torrust/tracker-deployer:latest \
  configure torrust-tracker-demo
This takes about 100 seconds. On success the environment state advances to Configured.
Step 7 — Stage the Release
The release command deploys the application layer to the configured VM: it creates storage directories,
renders and copies configuration files, and deploys docker-compose.yml and .env. It prepares the application layer
without starting services:
docker run --rm \
  -v $(pwd)/data:/var/lib/torrust/deployer/data \
  -v $(pwd)/build:/var/lib/torrust/deployer/build \
  -v $(pwd)/envs:/var/lib/torrust/deployer/envs \
  -v ~/.ssh:/home/deployer/.ssh:ro \
  torrust/tracker-deployer:latest \
  release torrust-tracker-demo
This step prepares the application layer (files, templates, and compose definitions) and
then transitions the environment to Released.
Step 8 — Start Services
The run command starts the Docker Compose services (via docker compose up -d), then validates that services are running and
externally accessible:
docker run --rm \
  -v $(pwd)/data:/var/lib/torrust/deployer/data \
  -v $(pwd)/build:/var/lib/torrust/deployer/build \
  -v ~/.ssh:/home/deployer/.ssh:ro \
  torrust/tracker-deployer:latest \
run torrust-tracker-demobackup profile and is not started by docker compose up. Scheduled backups run daily at 03:00 UTC via host cron. If
you want to create the first backup immediately after deployment, trigger it manually:ssh -i ~/.ssh/<ssh-key> torrust@<your-server-ip> "
cd /opt/torrust
sudo docker compose --profile backup run --rm backup
"Step 9 — Run Infrastructure Tests
The test command performs smoke tests against deployed services (Tracker API and HTTP Tracker endpoints)
and also runs advisory DNS resolution checks for configured domains. It can run against environments
in any state, as long as the instance is reachable:
docker run --rm \
  -v $(pwd)/data:/var/lib/torrust/deployer/data \
  -v $(pwd)/build:/var/lib/torrust/deployer/build \
  -v ~/.ssh:/home/deployer/.ssh:ro \
  torrust/tracker-deployer:latest \
  test torrust-tracker-demo
If you used floating IPs, expect DNS warnings — the deployer compares DNS results against
the server's primary IP rather than the floating IPs. A "result": "pass" alongside warnings is correct behaviour.
Verifying the Deployment
The deployer's test command covers infrastructure-level checks. For end-to-end protocol verification, use these
manual checks from your local machine. If you want the complete manual verification checklist,
see the deployer verify docs.
HTTP Tracker
curl "https://http1.torrust-tracker-demo.com/announce?info_hash=%89I%85%EE%A3%B1R%02r%93%E5%C6%7F%29%8B%5B%AD%8Ad%99&peer_id=-TR2940-k8hj0wgej6ch&port=51413&uploaded=0&downloaded=0&left=0&event=started"A healthy response returns a bencoded peers dictionary.
REST API
curl "https://api.torrust-tracker-demo.com/api/v1/stats" \
  -H "Authorization: Bearer <admin-token>"
Grafana
Open grafana.torrust-tracker-demo.com in a browser and log in with the admin credentials set in your environment config. You should see dashboards for tracker announces and system metrics.
The demo also exposes three read-only public dashboards that require no login:
Docker Services
SSH into the server and verify all containers are healthy:
ssh torrust@<your-server-ip> "docker compose -f /opt/torrust/docker-compose.yml ps"All services should report healthy (or running for services
without a health check defined). The full verification checklist — including MySQL,
storage volume, and backup verification — is published in the deployer verification docs.
Listing the Tracker on newTrackon
newTrackon continuously monitors open BitTorrent trackers and publishes them in public lists consumed by torrent clients. Getting listed provides uptime monitoring as a side-effect, and helps the BitTorrent community discover your tracker.
Two prerequisites must be met before submitting. We missed both during our first submission on 2026-03-04 — the HTTP tracker was accepted anyway, but the UDP tracker was not. For a full submission walkthrough, see Submitting Trackers to newTrackon.
BEP 34 DNS TXT Records
BEP 34 defines a DNS TXT record format that declares which ports a domain intentionally serves as a BitTorrent tracker. newTrackon uses this for validation. Add a TXT record on each tracker subdomain:
| Subdomain | TXT value |
|---|---|
http1.your-domain.com | BITTORRENT TCP:443 |
udp1.your-domain.com | BITTORRENT UDP:6969 |
One Tracker Per IP Address
newTrackon only accepts one tracker per IP address. If two tracker URLs resolve to the
same IP(s), only one can be listed. This is why we provisioned separate floating IPs for http1 and udp1 — each subdomain resolves to a unique IPv4 and IPv6
address, satisfying the policy.
If you only need one tracker listed publicly, a single pair of floating IPs is sufficient.
Secrets Rotation After AI-Assisted Deployment
We deployed with GitHub Copilot (Claude Sonnet) active in our editor. Any secrets that appeared in terminal output, configuration files, or SSH sessions were potentially processed by cloud infrastructure operated by Microsoft and Anthropic. After deployment, we rotated every secret:
| Secret | Action |
|---|---|
| Tracker admin token | Rotated |
| MySQL application user password | Rotated |
| MySQL root password | Rotated |
| Grafana admin password | Rotated |
| SSH deployer key | Rotated |
| Hetzner Cloud API token | Deleted (no longer needed post-deploy) |
| Hetzner DNS API token | Deleted (no longer needed post-DNS setup) |
.env and also in prometheus.yml as a scrape parameter). Missing any location when rotating
will silently break that service. The full secret-to-file map is documented in the deployer secrets rotation guide.Even if you are not using an AI coding assistant, rotating secrets after initial deployment is good practice — the API token used to provision the server is often still in your shell history or environment variables.
What We Learned — Bugs and Improvements
We treated this deployment as a comprehensive end-to-end test of the deployer. We discovered 11 bugs and 13 improvement opportunities. All critical bugs have been fixed ahead of the v0.1.0 release. Here are the most impactful findings.
Config Generation Issues
- IPv4-only bind addresses (B-01): The template defaulted to
0.0.0.0for all sockets, silently producing an IPv6-only-listening failure for all UDP clients on IPv6 networks. Fixed: default will be[::]. - SQLite default without warning (B-02): The template selected SQLite without prompting or noting that MySQL is recommended for production. Fixed: the template will prompt or include a clear comment.
Provisioning Issues
- SSH timeout too short (B-04): The original 120-second SSH probe budget
was too short for Hetzner's
ccx23instances, where cloud-init can take over 3 minutes. Fixed: increased to 300 seconds with configurable timeout. - Passphrase-protected SSH keys fail silently in Docker (B-05): When
running inside Docker (the standard workflow), there is no SSH agent. A
passphrase-protected deployment key causes every SSH probe to return
Permission deniedwith no diagnostic pointing to the passphrase as the cause. Fixed: the deployer now emits a clear warning. - Container SSH key path mismatch: When running via Docker, SSH key paths
in the config must be container-internal paths (
/home/deployer/.ssh/...), not host machine paths. This caused an immediate template rendering failure. Added to the documentation.
Service Start Issues
- MySQL restart loop (run bugs): Using
"root"as the MySQL application username caused MySQL 8.4 to reject startup, leaving all dependent services in a restart loop. Fixed: the deployer now validates this at environment creation time. Separately, the MySQL password must be URL-encoded in the tracker connection string — the deployer now handles this automatically.
Troubleshooting
SSH Key Paths Differ Between Host and Container
Symptom: provision fails immediately with "SSH public key file not found or unreadable".
Cause: The SSH key paths in your environment config JSON use host machine
paths (e.g. /home/yourname/.ssh/key), but when the deployer runs inside
Docker, your ~/.ssh directory is mounted at /home/deployer/.ssh/ inside the container.
Fix: In the ssh_credentials block of your config, always use the
container path:
{
  "ssh_credentials": {
    "private_key_path": "/home/deployer/.ssh/torrust_tracker_deployer_ed25519",
    "public_key_path": "/home/deployer/.ssh/torrust_tracker_deployer_ed25519.pub"
  }
}
If you have already run create environment with wrong paths, purge the environment and recreate it:
docker run --rm \
  -v $(pwd)/data:/var/lib/torrust/deployer/data \
  -v $(pwd)/build:/var/lib/torrust/deployer/build \
  -v $(pwd)/envs:/var/lib/torrust/deployer/envs \
  torrust/tracker-deployer:latest \
  purge torrust-tracker-demo --force
SSH Connectivity Times Out at Provision
Symptom: The Hetzner VM appears in the console but provision exits with an SSH connectivity timeout.
Cause: Hetzner cloud-init user provisioning on larger instance types (ccx23 and above) can take 3–4 minutes. Earlier versions of the deployer had a hardcoded 120-second
timeout, which was too short.
Fix: In v0.1.0 the timeout is set to 300 seconds, which is long enough
for Hetzner's cloud-init to complete. If provisioning still times out, the deployer
transitions to a failed state. You cannot retry directly — you must destroy the
environment and start from scratch: run destroy to remove the VM, then re-run
the full sequence from Step 3.
Passphrase-Protected SSH Key Fails in Docker
Symptom: provision repeatedly prints SSH auth failures even though
the key exists and permissions are correct.
Cause: There is no SSH agent inside the Docker container. Every SSH
attempt with a passphrase-protected key requires interactive passphrase entry, which the
deployer cannot do non-interactively. The result is silent Permission denied on every probe.
Fix: Use a passphrase-free deployment key. Generate a dedicated key without a passphrase for the deployer:
ssh-keygen -t ed25519 -C "torrust-tracker-deployer-no-passphrase" \
  -f ~/.ssh/torrust_tracker_deployer_ed25519 \
  -N ""
Store this key securely (e.g. a dedicated secrets manager, not your everyday keychain). Rotate it after deployment is complete.
Tracker Ignores MySQL Config and Uses SQLite
Symptom: After deployment, the tracker runs but all data is lost on restart, or you notice a SQLite database file on disk despite configuring MySQL.
Cause: The create template command silently defaults to SQLite without prompting. If you did not explicitly change the
database driver to MySQL in the config, SQLite is what gets deployed.
Fix: Edit the template before running validate and change the database.driver to "MySQL" with the full MySQL
connection details. If you've already deployed, you need to re-run the full configure → release → run sequence with the corrected config.
Tracker Container in Restart Loop After run
Symptom: run succeeds but the tracker container immediately enters a restart loop. MySQL health checks
fail or the tracker logs show a database connection error.
Common causes:
- MySQL application username set to
"root": MySQL 8.4 rejectsMYSQL_USER=root. Use any non-root username (e.g."torrust"). Fixed in v0.1.0 with a validation error atcreate environmenttime. - MySQL password not URL-encoded in connection string: If your MySQL password contains special characters, the tracker's TOML connection string requires percent-encoding. Fixed in v0.1.0 — the deployer now URL-encodes the password automatically during config rendering.
Diagnose with Docker logs on the server:
ssh torrust@<your-server-ip> "docker logs torrust-tracker --tail 50"UDP Tracker Unreachable via IPv6
Symptom: The UDP tracker works on IPv4 but IPv6 clients (including newTrackon probes) time out.
Root cause identified during our deployment:
Asymmetric routing on floating IPs: Without policy routing rules, UDP replies leave the server via the primary IP, not the floating IP the probe arrived on. The client receives a reply from a different address and discards it as spurious. In our case, this routing issue was the actual cause; UFW was not the blocker. The fix is the netplan policy routing configuration shown in Provision and Assign Floating IPs.
The full investigation — including all diagnostic commands and intermediate checks — is documented in the deployer investigation guide.
Recovering from a Failed Deployer Command
Situation: A deployer command fails mid-way and leaves the environment in
a failed state (ProvisionFailed, ConfigureFailed, etc.).
The deployer has no built-in recovery mechanism. If a command fails, the only fully supported path forward is to clean up and restart from scratch:
# Destroy infrastructure and purge local state
docker run --rm \
  -v $(pwd)/data:/var/lib/torrust/deployer/data \
  -v $(pwd)/build:/var/lib/torrust/deployer/build \
  torrust/tracker-deployer:latest \
  destroy torrust-tracker-demo

docker run --rm \
  -v $(pwd)/data:/var/lib/torrust/deployer/data \
  -v $(pwd)/build:/var/lib/torrust/deployer/build \
  -v $(pwd)/envs:/var/lib/torrust/deployer/envs \
  torrust/tracker-deployer:latest \
  purge torrust-tracker-demo --force
There is a theoretical recovery path via state file snapshots, but it is untested and only recommended if you understand exactly why the command failed and are confident the server is in a consistent, manually-completable state. The full recovery procedure is described in the deployment journal in the torrust-tracker-deployer repository.
Next Steps
The demo tracker is deployed and running. Here are the immediate next steps for the Torrust project:
- v0.1.0 release: The Torrust Tracker Deployer v0.1.0 release is imminent. All 11 bugs found during this deployment have been fixed. The release will include the Docker image, full user documentation, and the deployment journal as a reference.
- IPv6 floating IP automation: Post-provision floating IP configuration is currently manual. We plan to automate it in a future release.
- Configurable SSH timeout: The SSH probe timeout is now configurable (defaulting to 300 seconds) as of v0.1.0.
- Dual-stack defaults: The
create templatecommand will default to[::]bind addresses in v0.1.0. - Live demo: Both trackers are publicly accessible and monitored. You can
submit them as announce URLs in any BitTorrent client:
https://http1.torrust-tracker-demo.com/announceudp://udp1.torrust-tracker-demo.com:6969/announce
A full deployment guide is also maintained in the deployer repository under docs/user-guide/, including Hetzner-specific details and
post-deployment configuration guides.
If you run into issues or want to share your own deployment experience, open a discussion in the deployer repository or join our community.