
Introduction
Welcome to our guide on deploying a BitTorrent Index and Tracker. We’ll walk you through each step, explaining the process in a user-friendly manner, so you can understand the magic behind hosting a powerful, Rust-based application on the cloud.
This guide provides detailed, technical steps for deploying your Rust-based BitTorrent Index and Tracker on a Digital Ocean droplet. You’ll find precise commands and configurations to ensure a smooth, efficient setup.
You can find the docker compose configuration used in this guide on the following GitHub repo:
https://github.com/torrust/torrust-compose/tree/main/droplet
Although we are using a droplet, this tutorial is intended to be so generic that you should be able to setup the services in any virtual machine with docker and docker compose.
This tutorial is based on the Digital Ocean tutorial:
How To Secure a Containerized Node.js Application with Nginx, Let’s Encrypt, and Docker Compose.
We have only changed the docker compose configuration and some steps to configure the Torrust Index and Tracker instead of the sample node application.
After finishing this tutorial you will have these public services available (with your own domain):
- Torrust Index: https://index.torrust-demo.com
- Torrust HTTP Tracker: https://tracker.torrust-demo.com/announce
- Torrust UDP Tracker: udp://tracker.torrust-demo.com:6969/announce
Requirements
You will need:
- A Digital Ocean account.
- A Digital Ocean virtual machine (droplet) with Ubuntu 22.04.2 LTS.
- Docker, Docker Compose, SQLite3 and Git installed on the server.
We will explain how to install the required dependencies in the Ubuntu server.
Server
A Digital Ocean Droplet with a configuration similar to this:
- Datacenter: Frankfurt (FRA1).
- Image: Ubuntu 22.04 (LTS) x64.
- Droplet Type: Shared CPU (Basic).
- CPU options: Regular (Disk Type: SSD).
Resources:
- 1 GB/1CPU.
- 25 GB SS Disk.
- 1000 GB transfer.
Features:
- Backups enabled.
- With improved metrics monitoring and alerting.
Software
- Ubuntu 22.04.2 LTS (already installed in the droplet)
- Docker version 24.0.7, build afdd53b.
- Docker Compose version v2.3.3.
- SQLite3 version 3.37.2 2022-01-06 13:25:41 872ba256cbf61d9290b571c0e6d82a20c224ca3ad82971edc46b29818d5dalt1.
- Git version 2.34.1 (only for the installation).
The Docker images used by this tutorial are:
$ docker images --digests
REPOSITORY          TAG               DIGEST                                                                    IMAGE ID       CREATED       SIZE
torrust/tracker     develop           sha256:5589eaf57af277feda6eca6f841859fd2aa05af7deafca546ad0a17fe36d8e51   c42f0cce3304   4 days ago    160MB
nginx               mainline-alpine   sha256:3923f8de8d2214b9490e68fd6ae63ea604deddd166df2755b788bef04848b9bc   01e5c69afaf6   2 weeks ago   42.6MB
torrust/index       develop           sha256:69b12dfcb9c47267bd314f4869dfce7585d3f2b172200ef0d7d7bb776e209fe6   a3db4d4e5d6a   2 weeks ago   64.9MB
torrust/index-gui develop sha256:b30deb84cdee8fa34e4d3783ce2f467542e6fdc13a14dd6bbed879e2e2b82bcb 4f6e446cb009 2 weeks ago 175MBDomain
You will need a domain. We are using “torrust-demo.com” in this tutorial.
Initial Server Setup
Starting off, we’ll set up a virtual server using Ubuntu 22.04. Think of it as preparing a new computer for your application, ensuring it’s ready to run smoothly.
This section covers the initial configuration of your Ubuntu 22.04 server, focusing on essential security and performance optimizations.
Please refer to Digital Ocean Documentation for more information about how to create projects and droplets. Projects are the way DO (Digital Ocean) organizes resources (virtual machines, databases, domains, etc.). We have a project called “torrust-demo.com”.
Once you have created your project and droplet you can follow the Digital Ocean guide to setup a new Ubuntu server.
For this tutorial we have used our demo environment.
In this first step you will:
- Create a virtual machine (droplet).
- Access the virtual machine using the
rootaccount. - Create a new user
torrust. - Access the server using the new account
torrust.
After creating the droplet you should be able to connect by using SSH with the root account providing the password you set
during the droplet creation:
ssh root@139.59.150.216After logging in you can create the new user account:
adduser torrust
usermod -aG sudo torrust
The user is added to the sudo group you can can execute command as root when needed.
Setup SSH Keys
Security is key! Setting up SSH keys is like creating a special passcode for safe and secure access to your server.
Follow the Digital Ocean tutorial to establish secure SSH key authentication, enhancing the security of your server connections.
You have to generate a new key and copy it to the server:
ssh-copy-id -i ~/.ssh/torrust_rsa.pub torrust@139.59.150.216If all went fine you should be able to login to the server with your SSH key.
ssh torrust@139.59.150.216Install Docker
Docker is a tool that lets you run applications in a consistent environment. It’s like having a universal app runner that works the same everywhere.
You can also follow the DO guide: How To Install and Use Docker on Ubuntu 22.04.
In short, you only need to execute some commands:
sudo apt update
sudo apt install apt-transport-https ca-certificates curl software-properties-common
curl -fsSL https://download.docker.com/linux/ubuntu/gpg | sudo gpg --dearmor -o /usr/share/keyrings/docker-archive-keyring.gpg
echo "deb [arch=$(dpkg --print-architecture) signed-by=/usr/share/keyrings/docker-archive-keyring.gpg] https://download.docker.com/linux/ubuntu $(lsb_release -cs) stable" | sudo tee /etc/apt/sources.list.d/docker.list > /dev/null
sudo apt update
apt-cache policy docker-ce
sudo apt install docker-ce
sudo systemctl status docker
If you want to execute docker without sudo you will need to execute some more commands:
sudo usermod -aG docker ${USER}
su - ${USER}
Make sure docker is running with docker run hello-world.
Install Docker Compose
Docker Compose helps in running complex apps easily. It’s like a recipe that tells Docker how to prepare and serve your app.
You can follow the Digital Ocean Tutorial: How To Install and Use Docker Compose on Ubuntu 22.04
mkdir -p ~/.docker/cli-plugins/
curl -SL https://github.com/docker/compose/releases/download/v2.3.3/docker-compose-linux-x86_64 -o ~/.docker/cli-plugins/docker-compose
chmod +x ~/.docker/cli-plugins/docker-compose
And also make sure it’s installed correctly with docker compose version.
Install SQLite
SQLite is a simple database system. You won’t needed if you use MySQL for both the Index and Tracker. In this tutorial we will use it.
sudo apt update
sudo apt install sqlite3
You can check if it’s installed correctly with sqlite3 --version.
You can execute queries to get the Tracker or Index data connecting with:
$ sqlite3 ./storage/index/lib/database/sqlite3.db
SQLite version 3.37.2 2022-01-06 13:25:41
Enter ".help" for usage hints.
sqlite>
Some useful commands are:
.help: show help..tables: list tables..quit: exit.
Setup The DNS
Before running the application we have to setup the DNS. You can load the application using your domain instead of the droplet IP.
First at all, you need to change your name servers and use the ones from Digital Ocean. You have to find out how to do that in your domain provider.
Then you need to create two A records to point the domains to the droplet IP (or the reserved IP if you are using one).
Here is how the DNS configuration looks like for our demo:
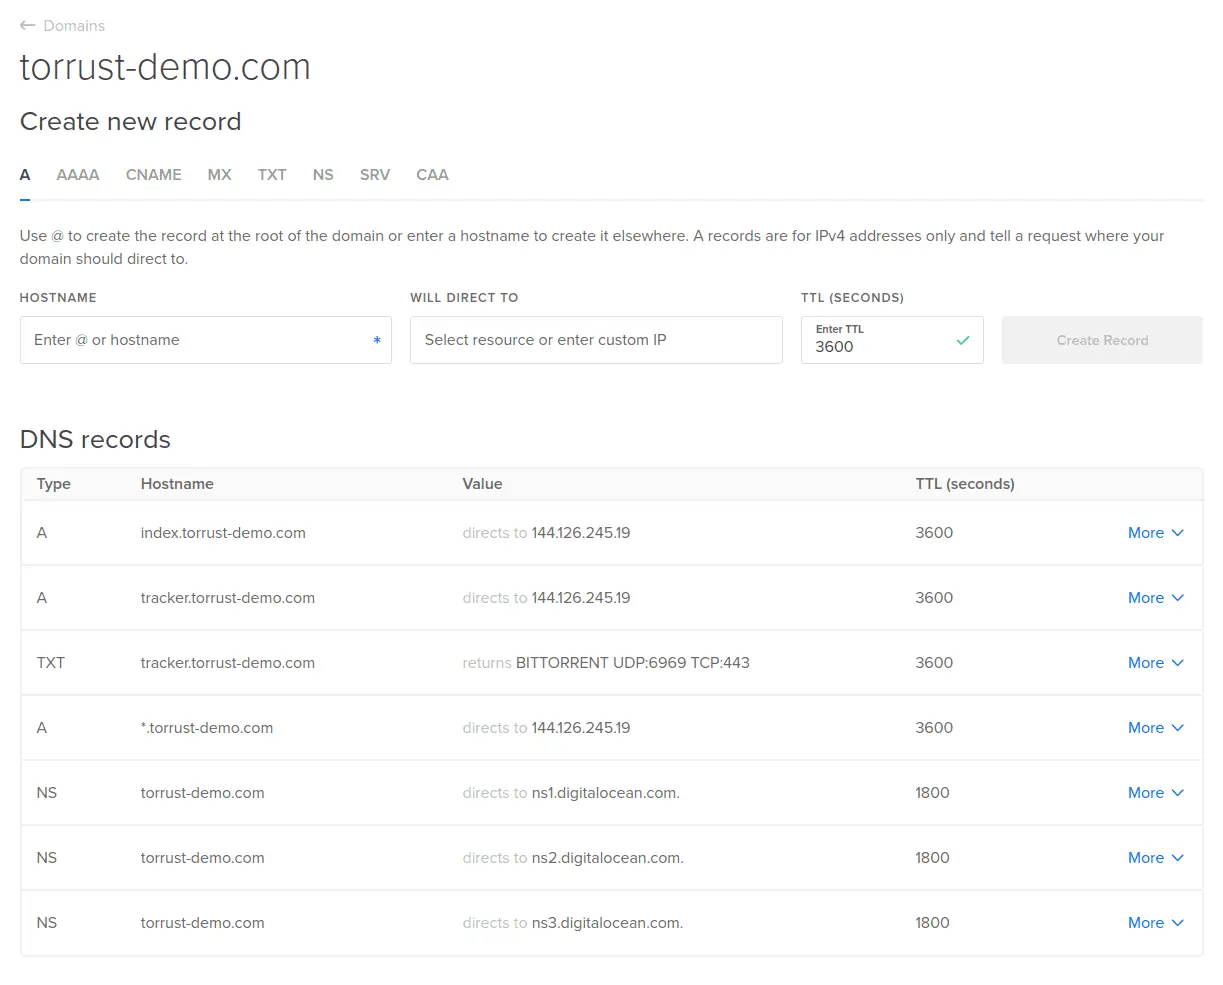
BEP 34
As you can see in our DNS configuration we have a TXT record for the tracker with this value:
BITTORRENT UDP:6969 TCP:443That record implements the BEP 34 DNS Tracker Preferences.
That allows administrators to declare the port and the service priorities for a tracker domain. In our case, we have two different trackers running on ports 6969 and 443 and we prioritize the UDP tracker.
Some services related to tracker (for instance https://newtrackon.com) use this DNS record to verify tracker URLs.
Install The Application
First, we will install the application on port 80 because we need a live app to generate the HTTPs certificates with
Let’s Encrypt. Once we generate the certificates we can change the configuration to serve the application on port 443.
Without certificates
We’ll start by launching your app in a basic, non-secure mode. Initial deployment steps will be covered, focusing on functionality before implementing SSL/TLS certificates. We need to run the application in order to generate certificates with Let’s Encrypt.
First, we need to get the docker compose configuration. You can download it directly from the Torrust Compose GitHub repo or you can use Git:
cd
  && mkdir -p github/torrust
  && cd torrust/
  && git clone --single-branch --branch main https://github.com/torrust/torrust-compose.git
  && cd torrust-compose/
  && git status
  && cd droplet/
If you use Git you will need to install it in the server. Follow the “How To Install Git on Ubuntu 22.04” guide.
After cloning the repository you have to run the install script:
$ ./bin/install.sh
Creating compose .env './.env'
Creating proxy config file: './storage/proxy/etc/nginx-conf/nginx.conf'
Creating index database: './storage/index/lib/database/sqlite3.db'
Creating index configuration: './storage/index/etc/index.toml'
Creating tracker database: './storage/tracker/lib/database/sqlite3.db'
Creating tracker configuration: './storage/tracker/etc/tracker.toml'
The script will create some needed directories and empty SQLite databases:
$ tree storage/
storage/
├── certbot
│   ├── etc
│   └── lib
├── dhparam
├── index
│   ├── etc
│   │   └── index.toml
│   └── lib
│       └── database
│           └── sqlite3.db
├── proxy
│   ├── etc
│   │   └── nginx-conf
│   │       └── nginx.conf
│   └── webroot
└── tracker
    ├── etc
    │   └── tracker.toml
    └── lib
        └── database
            └── sqlite3.db

17 directories, 5 files
Now you can continue with some customizations. You can adjust the default configuration for all services or leave the default values. But at least you must change the domain and the secrets.
First open the .env file and find these environment variables:
TORRUST_INDEX_GUI_API_BASE_URLTORRUST_INDEX_CONFIG_OVERRIDE_TRACKER__TOKENTORRUST_INDEX_CONFIG_OVERRIDE_AUTH__SECRET_KEYTORRUST_TRACKER_CONFIG_OVERRIDE_HTTP_API__ACCESS_TOKENS__ADMIN
Replace the value for TORRUST_INDEX_GUI_API_BASE_URL with your domain:
TORRUST_INDEX_GUI_API_BASE_URL='http://index.your-domain.com/api/v1'You can generate the Tracker API token and the Auth Secret Key with:
 gpg --armor --gen-random 1 40
jcrmbzlGyeP7z53TUQtXmtltMb5TubsIE9e0DPLnS4Ih29JddQw5JA==Now, you should be able to run the application with the following command:
docker compose up --build --detachIf you have reached this point, congratulations! you already have these live services:
- Torrust Index: http://index.your-domain.com
- Torrust HTTP Tracker: http://tracker.your-domain.com/announce
- Torrust UDP Tracker: udp://tracker.your-domain.com:6969/announce
In the next sections we will describe how to use Let’s Encrypt to generate certificates to use HTTPs for the Index website and HTTP Tracker.
Generate Certificates With Let’s Encrypt
Let’s Encrypt provides free certificates. You’ll learn how to obtain and configure Let’s Encrypt SSL certificates for secure HTTPS connections.
First, you need to log in the “certbot” container. Certbot is a free, open source software tool for automatically (using Let’s Encrypt certificates) enable HTTPS.
docker compose run --entrypoint /bin/sh certbotOnce you are logged in the certbot container you need to execute these certbot commands to generate the staging certificates:
certbot certonly --webroot --webroot-path=/var/www/html --email email@example.com --agree-tos --no-eff-email --staging -d index.torrust-demo.com
certbot certonly --webroot --webroot-path=/var/www/html --email email@example.com --agree-tos --no-eff-email --staging -d tracker.torrust-demo.com
Replace email@example.com with your email.
For the production certificates you can execute the same command but removing the flag --staging:
certbot certonly --webroot --webroot-path=/var/www/html --email email@example.com --agree-tos --no-eff-email --force-renewal -d index.torrust-demo.com
certbot certonly --webroot --webroot-path=/var/www/html --email email@example.com --agree-tos --no-eff-email --force-renewal -d tracker.torrust-demo.com
In the directory storage/certbot/etc/live you should have at least one directory per domain.
Change Nginx Configuration To Use Certificates
Once we have the certificates, we’ll tell our server (Nginx) to use them, ensuring a secure website. Detailed steps to modify your Nginx configuration for SSL implementation will be provided.
Generate The Diffie-Hellman Key
sudo openssl dhparam -out /home/torrust/github/torrust/torrust-compose/droplet/storage/dhparam/dhparam-2048.pem 2048Update Nginx Configuration
Edit the file ./storage/proxy/etc/nginx-conf/nginx.conf and uncomment all the commented lines for HTTPs servers:
server
{
  listen 443 ssl http2;
  listen [::]:443 ssl http2;
  server_name index.torrust-demo.com;

  server_tokens off;

  ssl_certificate /etc/letsencrypt/live/index.torrust-demo.com-0001/fullchain.pem;
  ssl_certificate_key /etc/letsencrypt/live/index.torrust-demo.com-0001/privkey.pem;

  ssl_buffer_size 8k;

  ssl_dhparam /etc/ssl/certs/dhparam-2048.pem;

  ssl_protocols TLSv1.2;
  ssl_prefer_server_ciphers on;

  ssl_ciphers ECDH+AESGCM:ECDH+AES256:ECDH+AES128:DH+3DES:!ADH:!AECDH:!MD5;

  ssl_ecdh_curve secp384r1;
  ssl_session_tickets off;

  ssl_stapling on;
  ssl_stapling_verify on;
  resolver 8.8.8.8;

  location ^~/api/
  {
    rewrite ^/api/(.*)$ /$1 break;
    try_files $uri @index;
  }

  location /
  {
    try_files $uri @index-gui;
  }

  location @index
  {
    proxy_pass http://index:3001;
    add_header X-Frame-Options "SAMEORIGIN" always;
    add_header X-XSS-Protection "1; mode=block" always;
    add_header X-Content-Type-Options "nosniff" always;
    add_header Referrer-Policy "no-referrer-when-downgrade" always;
    add_header Content-Security-Policy "default-src * data: 'unsafe-eval' 'unsafe-inline'" always;
    #add_header Strict-Transport-Security "max-age=31536000; includeSubDomains; preload" always;
    # enable strict transport security only if you understand the implications
  }

  location @index-gui
  {
    proxy_pass http://index-gui:3000;
    add_header X-Frame-Options "SAMEORIGIN" always;
    add_header X-XSS-Protection "1; mode=block" always;
    add_header X-Content-Type-Options "nosniff" always;
    add_header Referrer-Policy "no-referrer-when-downgrade" always;
    add_header Content-Security-Policy "default-src * data: 'unsafe-eval' 'unsafe-inline'" always;
    #add_header Strict-Transport-Security "max-age=31536000; includeSubDomains; preload" always;
    # enable strict transport security only if you understand the implications
  }

  root /var/www/html;
  index index.html index.htm index.nginx-debian.html;
}

server
{
  listen 443 ssl http2;
  listen [::]:443 ssl http2;
  server_name tracker.torrust-demo.com;

  server_tokens off;

  ssl_certificate /etc/letsencrypt/live/tracker.torrust-demo.com/fullchain.pem;
  ssl_certificate_key /etc/letsencrypt/live/tracker.torrust-demo.com/privkey.pem;

  ssl_buffer_size 8k;

  ssl_dhparam /etc/ssl/certs/dhparam-2048.pem;

  ssl_protocols TLSv1.2;
  ssl_prefer_server_ciphers on;

  ssl_ciphers ECDH+AESGCM:ECDH+AES256:ECDH+AES128:DH+3DES:!ADH:!AECDH:!MD5;

  ssl_ecdh_curve secp384r1;
  ssl_session_tickets off;

  ssl_stapling on;
  ssl_stapling_verify on;
  resolver 8.8.8.8;

  location /api/
  {
    try_files $uri @tracker-api;
  }

  location /
  {
    try_files $uri @tracker-http;
  }

  location @tracker-api
  {
    proxy_pass http://tracker:1212;
    add_header X-Frame-Options "SAMEORIGIN" always;
    add_header X-XSS-Protection "1; mode=block" always;
    add_header X-Content-Type-Options "nosniff" always;
    add_header Referrer-Policy "no-referrer-when-downgrade" always;
    add_header Content-Security-Policy "default-src * data: 'unsafe-eval' 'unsafe-inline'" always;
    #add_header Strict-Transport-Security "max-age=31536000; includeSubDomains; preload" always;
    # enable strict transport security only if you understand the implications
  }

  location @tracker-http
  {
    proxy_pass http://tracker:7070;
    add_header X-Frame-Options "SAMEORIGIN" always;
    add_header X-XSS-Protection "1; mode=block" always;
    add_header X-Content-Type-Options "nosniff" always;
    add_header Referrer-Policy "no-referrer-when-downgrade" always;
    add_header Content-Security-Policy "default-src * data: 'unsafe-eval' 'unsafe-inline'" always;
    #add_header Strict-Transport-Security "max-age=31536000; includeSubDomains; preload" always;
    # enable strict transport security only if you understand the implications

    proxy_set_header X-Forwarded-For $proxy_add_x_forwarded_for;
  }

  root /var/www/html;
  index index.html index.htm index.nginx-debian.html;
}
Make sure you also change the domains:
- index.torrust-demo.com
- tracker.torrust-demo.com
You also have to change the API base URL in the .env file:
TORRUST_INDEX_GUI_API_BASE_URL=https://index.torrust-demo.com/api/v1Replace it from http://index.torrust-demo.com/api/v1 to https://index.torrust-demo.com/api/v1.
After changing the Nginx configuration you need to restart the Nginx server:
docker compose --ansi never restart proxySetup Cronjob To Renew Certificates
Certificates expire, so we’ll set up an automatic renewal system, like a subscription that renews itself. We will set up an automate SSL certificate renewal using cronjobs to maintain continuous security.
We will use crontab to execute a command every day:
sudo crontab -eAdd the following crontab line:
0 12 * * * /home/torrust/github/torrust/torrust-compose/droplet/bin/ssl_renew.sh >> /var/log/cron.log 2>&1You can check the cronjob output with:
tail -f /var/log/cron.logAfter generating the certificates and renewing them you should have a certbot directory structure similar to this:
$ sudo tree storage/certbot/
[sudo] password for torrust:
storage/certbot/
├── etc
│   ├── accounts
│   │   ├── acme-staging-v02.api.letsencrypt.org
│   │   │   └── directory
│   │   │       └── b39c03e978*****df8366ab6539
│   │   │           ├── meta.json
│   │   │           ├── private_key.json
│   │   │           └── regr.json
│   │   └── acme-v02.api.letsencrypt.org
│   │       └── directory
│   │           └── 441a435b0f8*****cc6dd22f34468
│   │               ├── meta.json
│   │               ├── private_key.json
│   │               └── regr.json
│   ├── archive
│   │   ├── index.torrust-demo.com
│   │   │   ├── cert1.pem
│   │   │   ├── chain1.pem
│   │   │   ├── fullchain1.pem
│   │   │   └── privkey1.pem
│   │   ├── index.torrust-demo.com-0001
│   │   │   ├── cert1.pem
│   │   │   ├── cert2.pem
│   │   │   ├── chain1.pem
│   │   │   ├── chain2.pem
│   │   │   ├── fullchain1.pem
│   │   │   ├── fullchain2.pem
│   │   │   ├── privkey1.pem
│   │   │   └── privkey2.pem
│   │   └── tracker.torrust-demo.com
│   │       ├── cert1.pem
│   │       ├── cert2.pem
│   │       ├── cert3.pem
│   │       ├── chain1.pem
│   │       ├── chain2.pem
│   │       ├── chain3.pem
│   │       ├── fullchain1.pem
│   │       ├── fullchain2.pem
│   │       ├── fullchain3.pem
│   │       ├── privkey1.pem
│   │       ├── privkey2.pem
│   │       └── privkey3.pem
│   ├── live
│   │   ├── README
│   │   ├── index.torrust-demo.com
│   │   │   ├── README
│   │   │   ├── cert.pem -> ../../archive/index.torrust-demo.com/cert1.pem
│   │   │   ├── chain.pem -> ../../archive/index.torrust-demo.com/chain1.pem
│   │   │   ├── fullchain.pem -> ../../archive/index.torrust-demo.com/fullchain1.pem
│   │   │   └── privkey.pem -> ../../archive/index.torrust-demo.com/privkey1.pem
│   │   ├── index.torrust-demo.com-0001
│   │   │   ├── README
│   │   │   ├── cert.pem -> ../../archive/index.torrust-demo.com-0001/cert2.pem
│   │   │   ├── chain.pem -> ../../archive/index.torrust-demo.com-0001/chain2.pem
│   │   │   ├── fullchain.pem -> ../../archive/index.torrust-demo.com-0001/fullchain2.pem
│   │   │   └── privkey.pem -> ../../archive/index.torrust-demo.com-0001/privkey2.pem
│   │   └── tracker.torrust-demo.com
│   │       ├── README
│   │       ├── cert.pem -> ../../archive/tracker.torrust-demo.com/cert3.pem
│   │       ├── chain.pem -> ../../archive/tracker.torrust-demo.com/chain3.pem
│   │       ├── fullchain.pem -> ../../archive/tracker.torrust-demo.com/fullchain3.pem
│   │       └── privkey.pem -> ../../archive/tracker.torrust-demo.com/privkey3.pem
│   ├── renewal
│   │   ├── index.torrust-demo.com-0001.conf
│   │   ├── index.torrust-demo.com.conf
│   │   └── tracker.torrust-demo.com.conf
│   └── renewal-hooks
│       ├── deploy
│       ├── post
│       └── pre
└── lib

22 directories, 49 filesExposed services
After finishing the instalaltion the main available services are:
- The Index: http://index.torrust-demo.com/
- The HTTP Tracker: https://tracker.torrust-demo.com/announce
- The UDP Tracker: udp://tracker.torrust-demo.com:6969/announce
But there are some other exposed ports. In addition to the SSH port (22), when you run the container you’ll expose all the following ports on the server:
- 80 (proxy)
- 443 (proxy)
- 3001 (index-gui)
- 3000 (index)
- 6969 (tracker)
- 7070 (tracker)
- 1212 (tracker)
You should have access to all exposed services by default.
You should be able to access the services directly (with no proxy) connecting to the containers:
- Index GUI (webapp): http://index.torrust-demo.com:3000
- Index (API): http://tracker.torrust-demo.com:3001
- Tracker (HTTP): http://tracker.torrust-demo.com:7070/announce
- Tracker (UDP): udp://tracker.torrust-demo.com:6969
- Tracker (API): http://tracker.torrust-demo.com:1212
But you should also be able to connect to all services except the UDP Tracker via the Nginx proxy both with HTTP or HTTPs:
HTTP access to services via proxy:
Index GUI (webapp): http://index.torrust-demo.com
Index (API): http://index.torrust-demo.com/api
Tracker (HTTP): http://tracker.torrust-demo.com/announce
Tracker (API): http://tracker.torrust-demo.com/api
HTTPs access to services via proxy:
Index GUI (webapp): https://index.torrust-demo.com
Index (API): https://index.torrust-demo.com/api
Tracker (HTTP): https://tracker.torrust-demo.com/announce
Tracker (API): https://tracker.torrust-demo.com/api
You can disable both, direct access to the container (without using the Nginx proxy) and also access without certificates (HTTP). In that case you only need to expose port: 443 and 6969. In order to do that you will
need to enable a firewall on the server or the Digital Ocean firewall.
Firewall
By default there is no firewall on the server. If you want to enable the firewall you have two options:
You can enable the UFW firewall on the server by following the Digital Ocean guide:
How To Set Up a Firewall with UFW on Ubuntu 22.04.
For example, you can allow only the ports 22, 43 and 6969 with the following command:
sudo ufw default deny incoming
sudo ufw default allow outgoing
sudo ufw allow ssh
sudo ufw allow 443
sudo ufw allow 6969/udp
sudo ufw enable
sudo ufw status verboseHealth checks
Some services expose public health check endpoints.
Via proxy (HTTP):
- Index API: http://index.torrust-demo.com/api/health_check
- Tracker API: http://tracker.torrust-demo.com/api/health_check
- Tracker HTTP: http://tracker.torrust-demo.com/health_check
Via proxy (HTTPs):
- Index: https://index.torrust-demo.com/api/health_check
- Tracker API: https://tracker.torrust-demo.com/api/health_check
- Tracker HTTPs: https://tracker.torrust-demo.com/health_check
Direct access:
- Index API: http://tracker.torrust-demo.com:3001/health_check
- Tracker API: http://tracker.torrust-demo.com:1212/health_check
- Tracker HTTP: http://tracker.torrust-demo.com:7070/health_check
Troubleshooting
You might have problems setting up the application. There are some useful things you should know in order to be able to address potential problems.
First, it might be useful to enable the debug logging for some services. Both the Index and the Tracker
have a configuration option log_level = "info". You can change the logging level to debug or even trace.
Configuration files are located in:
./storage/index/etc/index.toml../storage/tracker/etc/tracker.toml.
If you change the config files you will need to restart the services:
docker compose restartYou can also check the logs of any service with:
docker compose logs proxy
docker compose logs certbot
docker compose logs index
docker compose logs index-gui
docker compose logs tracker
If you change the config files you will need to restart the services.
You can also enable the debug for the Nginx proxy. Edit the file ./storage/proxy/etc/nginx-conf/nginx.conf and add error_log to the server configuration:
server
{
    listen 443 ssl http2;
    listen [::]:443 ssl http2;
    server_name index.torrust-demo.com;

    error_log /var/log/nginx/error.log debug;

    ...
}
If your server does not have too much disk space you could run out of disk space.
Docker stores the logs in a separate directory, if you want to truncate the logs you can find them first with:
sudo : > $(docker inspect --format='{{.LogPath}}' tracker)
-bash: /var/lib/docker/containers/397484cca9572d98524e4f81095bb27f90c349306c39bc517afe5bcb3a6d7f5e/397484cca9572d98524e4f81095bb27f90c349306c39bc517afe5bcb3a6d7f5e-json.log: Permission denied
And then truncate the file with:
sudo truncate -s 0 /var/lib/docker/containers/397484cca9572d98524e4f81095bb27f90c349306c39bc517afe5bcb3a6d7f5e/397484cca9572d98524e4f81095bb27f90c349306c39bc517afe5bcb3a6d7f5e-json.logThe docker compose configuration sets a limit on the number of log files and their size.
Finally, if you need some URL to test the HTTP tracker you can use these ones:
- Announce request: https://tracker.torrust-demo.com/announce?info_hash=%44%3C%76%02%B4%FD%E8%3D%11%54%D6%D9%DA%48%80%84%18%B1%81%B6&peer_addr=2.137.87.41&downloaded=0&uploaded=0&peer_id=-qB00000000000000001&port=17548&left=0&event=completed&compact=0
- Scrape request: https://tracker.torrust-demo.com/scrape?info_hash=%44%3C%76%02%B4%FD%E8%3D%11%54%D6%D9%DA%48%80%84%18%B1%81%B6
The infohash used is 443C7602B4FDE83D1154D6D9DA48808418B181B6.
Maintenance
Backups
All the data used by the application is in the storage folder.
We are using SQLite so the only thing we need to do is to backup the database files.
- Index database:
index/lib/database/sqlite3.db - Tracker database:
tracker/lib/database/sqlite3.db
We enabled backups for the droplet when we created it. Droplet backups are generated once per week. You should setup a better backup policy or use a MySQL service that provides backup. An easy way to increase the number of backups would be to mount a volume and periodically backup the files you want to backup, for example the database files or the configuration files.
Alternatively, you can use SnapShooter to backup droplets and volumes.
How to setup a proper backup policy is out of the scope of this tutorial.
Monitoring
It’s important to know the state of your services. Digital Ocean allow you to set:
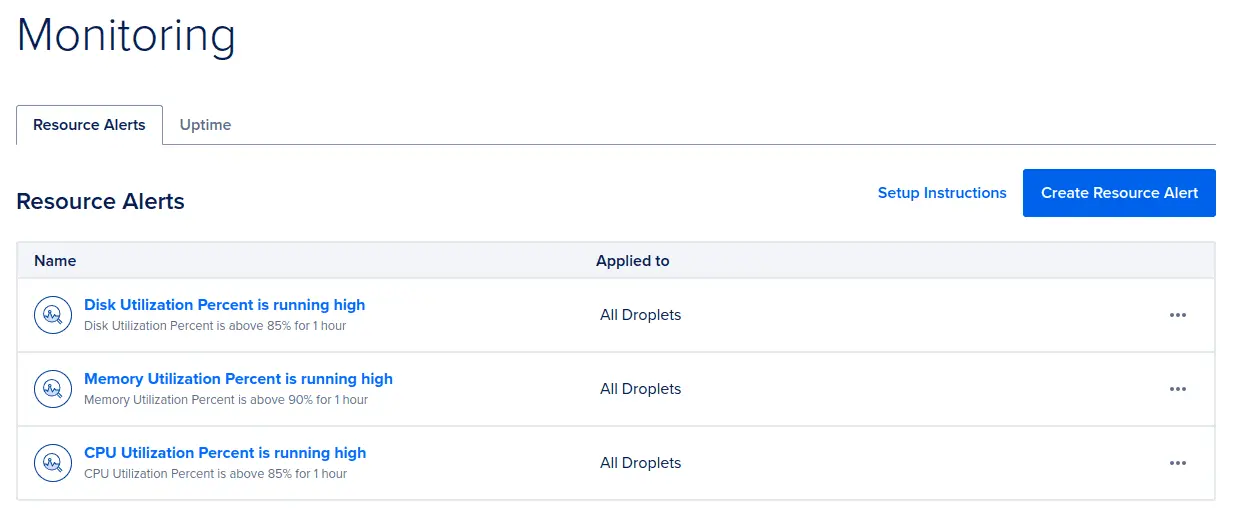
- Resource alerts
- Uptime checks
We have set up both.
With the “resource alerts” you can be notified when the droplet is having trouble with the resources (memory, CPU, disk or bandwidth).
And “uptime checks” can be used to monitor the state of the services.
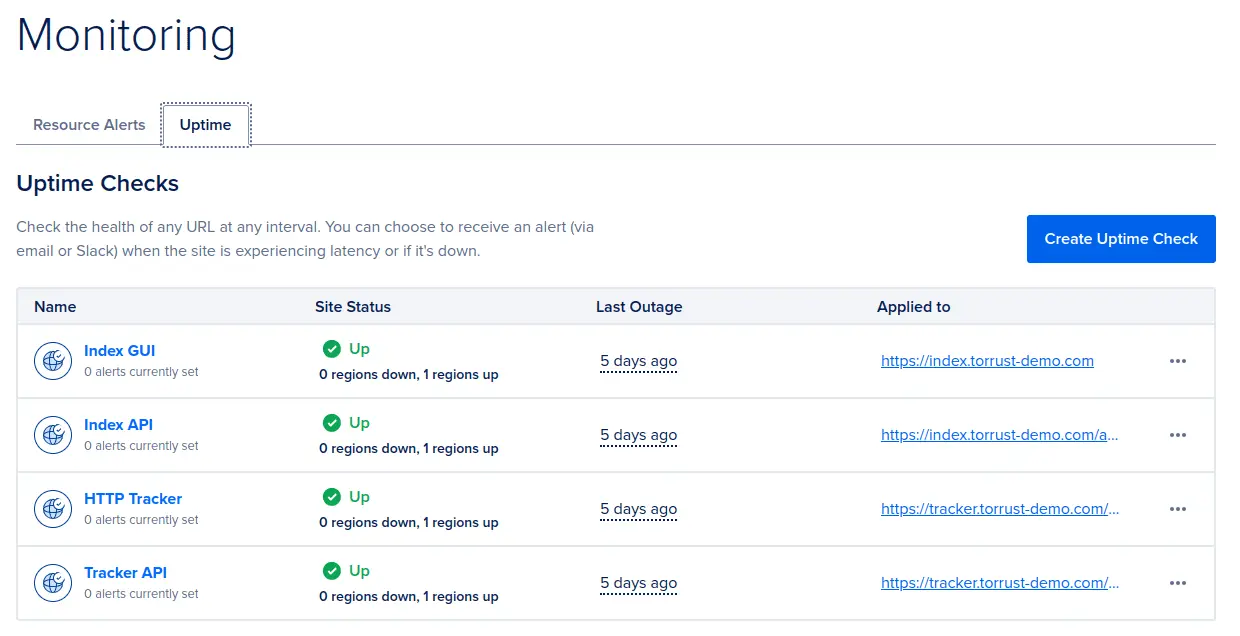
We used the health check endpoints for some services like APIs and the HTTP tracker.
Cost
- Basic droplet (1GB/1CPU, 25GB SSD Disk, 1000GB transfer): $6 per month.
- Weekly droplet backup: $1.20 per month.
- Reserved IP: $5.00 per month.
- Domain: depends on your provider.
Total cost: $12.2 per month.
See Digital Ocean pricing for more information.
Other Considerations
Adding The Tracker To Public Lists
If you are interested in, you can add your tracker to some tracker lists, for example: https://newtrackon.com.
Sending Emails
We have not enabled email verification. If you enable it you will need to configure the SMTP server in the Index configuration:
[mail]
email_verification_enabled = false
from = "example@email.com"
reply_to = "noreply@email.com"
username = ""
password = ""
server = "mailcatcher"
port = 1025Docker Image Tags
We have used the develop tag for the Docker images. We will update this guide to use version v3.0 once it’s released.
Links
- How To Secure a Containerized Node.js Application with Nginx, Let’s Encrypt, and Docker Compose
- Initial Server Setup with Ubuntu 22.04
- How to Set Up SSH Keys on Ubuntu 22.04
- How To Install and Use Docker on Ubuntu 22.04
- How To Install and Use Docker Compose on Ubuntu 22.04
- How To Set Up a Firewall with UFW on Ubuntu 22.04
- How To Install Git on Ubuntu 22.04
- How To Set Up a Firewall with UFW on Ubuntu 22.04
- BEP 34 DNS Tracker Preferences
- https://letsencrypt.org/
- https://certbot.eff.org/
- UDP Tracker with Nginx proxy
- Digital Ocean - Backups Features.
- Droplets and Volumes Backups with SnapShooter
- Digital Ocean pricing
Conclusion
With containerization, having a production ready Index and Tracker with Torrust is very easy. Containerization allows you to install the application in many different hosting providers with no effort.
It also allows you to keep your production environment up to date, because it’s also possible to easily update the docker images.
And finally, you can also scale up your production environment as long as the demand increases. For example, just increasing the droplet size.
We hope you find this guide useful. Let us know what you think about it!
- Do you think the process is to complex?
- Do you think the process could be improved or simplified?
- Is there something missing you want to know about?
If you see something wrong or you want to contribute by:
- Adding new sections.
- Fixing typos.
- Making it clearer.
- Adding links.
- Or whatever you think that could be interesting to have,
If you have any questions or issues please open an issue in the corresponding repository:
- Torrust Tracker: https://github.com/torrust/torrust-tracker/issues
- Torrust Index: https://github.com/torrust/torrust-index-backend/issues
- Torrust Website: https://github.com/torrust/torrust-index-frontend/issues
- Torrust Compose: https://github.com/torrust/torrust-compose
- Containerizing Rust Applications Examples: https://github.com/torrust/containerizing-rust-apps-examples
We very welcome any contributions to the projects or this article.