Table of contents
Introduction to UNIT3D
This blog post serves as an introduction to our review series at Torrust, where we’ll continue to explore and evaluate other projects within the BitTorrent ecosystem.
UNIT3D is a private torrent tracker software, crafted meticulously in PHP using the Laravel framework. Whether you’re a developer looking to deploy a robust BitTorrent index or an enthusiast exploring the depths of the BitTorrent ecosystem, this guide will walk you through UNIT3D’s features and provide a detailed, step-by-step setup tutorial.
UNIT3D was created from scratch. The first commit was on December 2017.
- Repo: https://github.com/HDInnovations/UNIT3D-Community-Edition
- Contributors: 116
- Starts: 1.9k.
- Production Stats:
- Installations: 26
- Users: 235,041
- Torrents: 1,570,340
- Peers: 5,881,717
- Official Demo Site: https://unit3d.dev/ (currently not working).
Stats from Private-Trackers-Spreadsheet.
To write this post we have setup a new demo site on: https://www.unit3d-demo.com/. Following the tutorial section you can also easily deploy your UNIT3D Index. The demo site could be shutdown at any time.
Overview
It’s not our intention to list and evaluate all the features because that would be a really hard task. However we want to give you an idea about how many features this software includes:
Key features
Torrents
- Index, Search, Upload
- Requests
- RSS
Community
- Forums
- Chatrooms with chatbot
- Playlists
- Polls
- News
- Bonus Points
- User profiles
- Achievements
Support
- Custom pages: rules, FAQ, Wikis
- Helpdesk
- Staff
Platform Management
- Logs
- Access Restrictions
- Client Blacklist
- Whitelisted Image URLs
- Blocked IPs
- Torrents
- Moderation
- Classification: categories, resolutions, regions, distributions
- Peers
- Users
- Search
- Applications, Invitations
- Keys: API, passkeys, RSS keys, 2FA, …
- Groups (roles)
- Notifications (alerts)
- Messages
Integrations
- Torrent API: https://github.com/HDInnovations/UNIT3D-Community-Edition/wiki/Torrent-API-(UNIT3D-v8.x.x)
- Other metadata API like https://www.themoviedb.org/
UNIT3D Review
Code Quality and Structure
UNIT3D boasts a well-organized codebase, adhering to modern PHP development standards. The use of Laravel as the underlying framework ensures a modular structure, making it easier for developers to extend and customize the platform. Code readability is generally high, with well-commented sections that clarify complex logic.
Documentation and User Guides
The documentation for UNIT3D system dependencies is comprehensive, covering local development and basic server management. However, there is room for improvement in terms of end user guides, tutorials, examples, installation for production and troubleshooting guides.
Community Support and Activity
UNIT3D has an active and growing community. The project’s GitHub repository shows regular commits, indicating ongoing development. There are also Discord channels for sponsors where they and developers discuss issues, share tips, and contribute to the project’s roadmap. You can also support UNIT3D development via https://polar.sh/HDInnovations.
Contribution Guidelines and License
UNIT3D is licensed under the AGPL-3.0 license license. The contribution guidelines are well-documented, with clear instructions on how to fork the repository, submit pull requests, and report issues.
Installation Process Overview
UNIT3D offers an installer. At the time of this writing it supports:
- Ubuntu 22.04 LTS (Jammy Jellyfish).
- Ubuntu 20.04 LTS (Focal Fossa)
We followed the instructions and the process was easy and fast. We will describe the process in detail in the installation tutorial. Hopefully, that will make the process even easier for other users.
Tutorial: Setting Up UNIT3D on a Digital Ocean Droplet
To install the software we have followed the steps described in the official installer:
https://github.com/HDInnovations/UNIT3D-Installer.
Requirements
Although you can just execute the installer directly you will need to create some services during the installation. We would recommend to fulfill all the requirements before executing the installer, that would make the process faster and you can avoid some mistakes we made.
Let’s review what you will need:
- Server (virtual machine)
- External Services
- System requirements (software installed on the server)
Hardware Requirements (server)
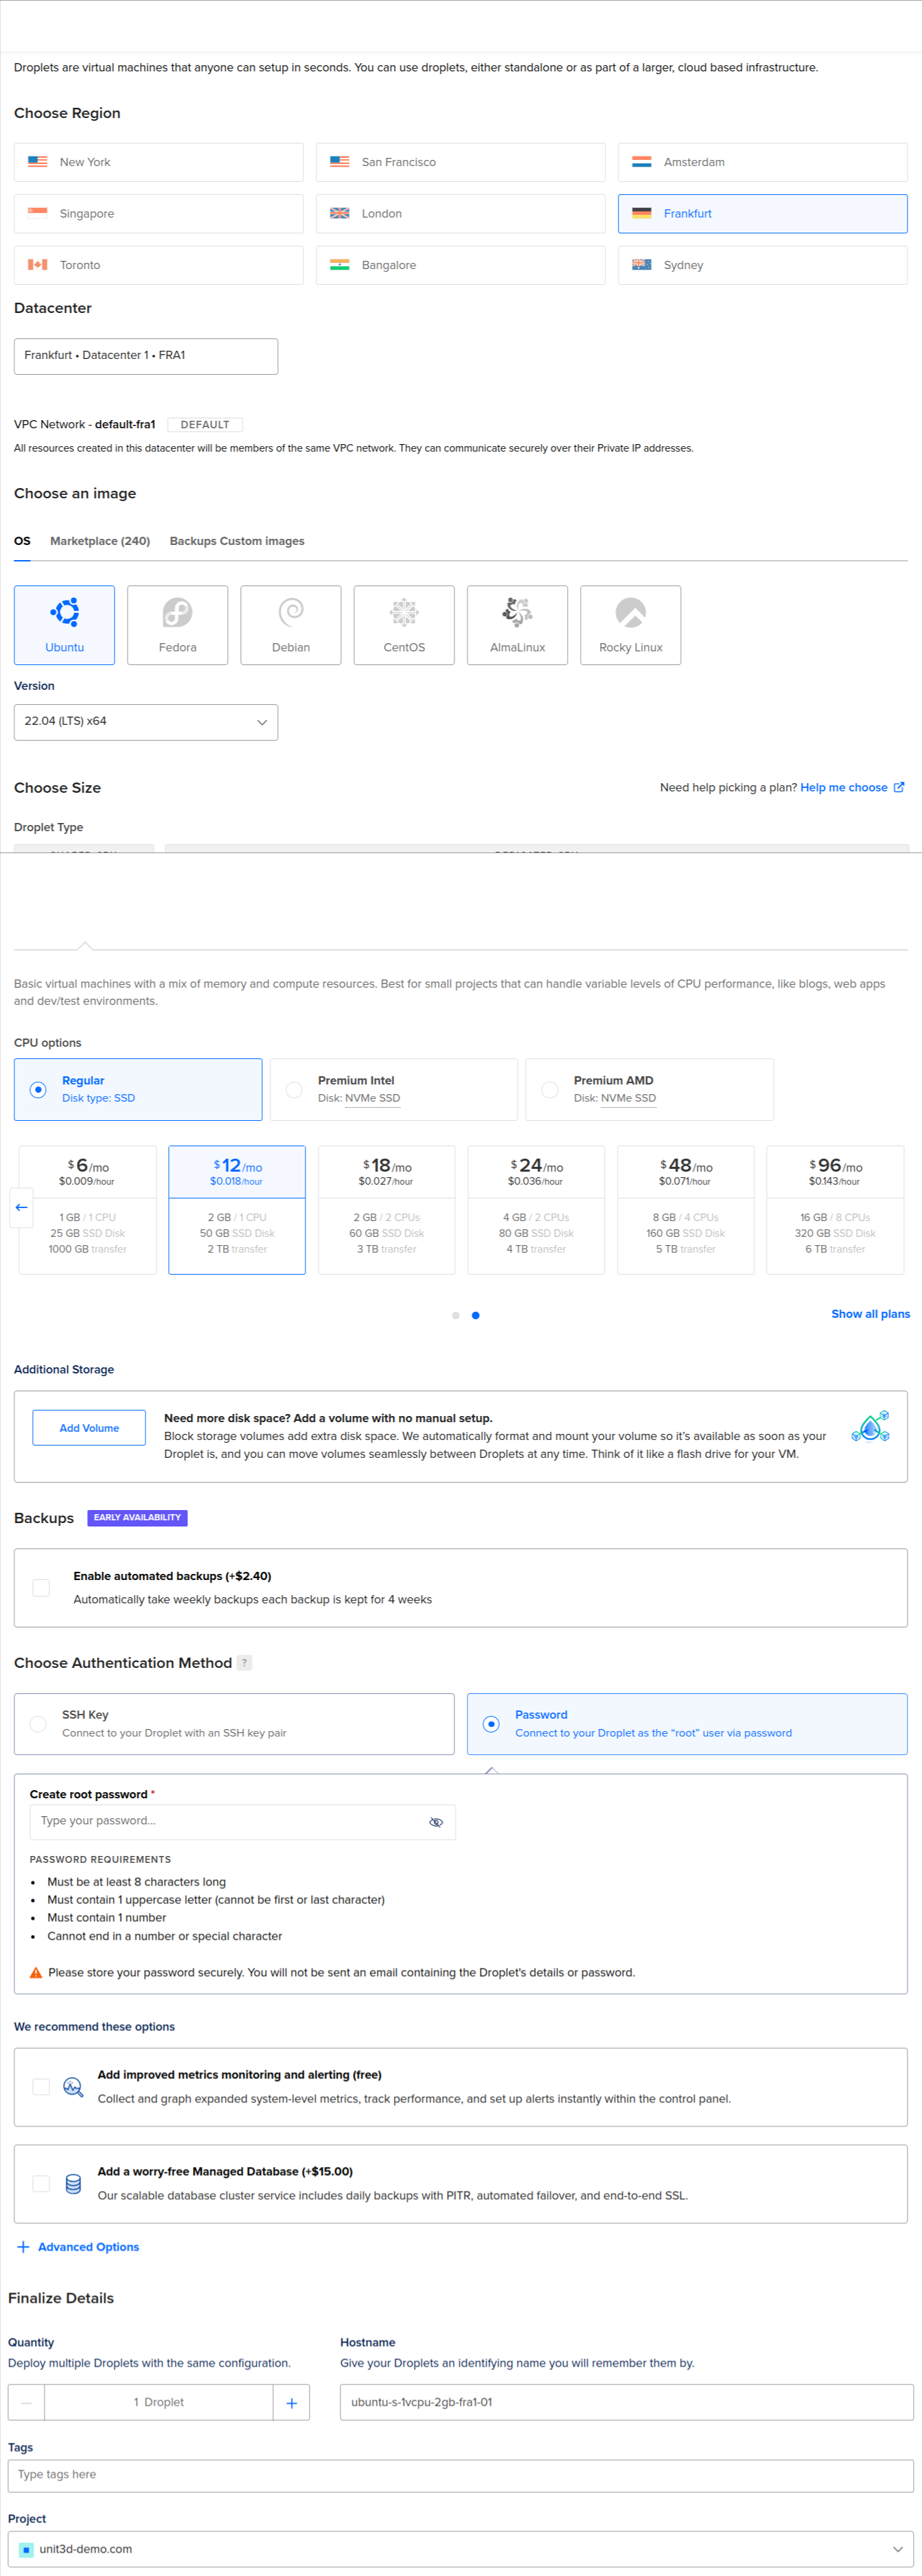
We opted for using a Digital Ocean droplet just because we are used to their interface and it’s straightforward. Feel free to use your favorite provider.
In our first attempt we used the minimum size image. However it was too small. The server had problems building the frontend and that’s one of the last steps in the installation. Finally we used a VM (Digital Ocean call them droplets) with these characteristics:
- Image: Ubuntu 22.04 (LTS) x64
- Size: 1 vCPU; 2GB / 50GB Disk; ($12/month)
External Services
- Domain: We registered a new one only for this purpose: https://unit3d-demo.com/.
- DNS: Since We are using Digital Ocean, we only needed to assign the the Digital Ocean’s name servers to the domain.
- Email delivery service: We just picked up one from the list of supported services by UNIT3D. We selected https://postmarkapp.com/.
How to register the domain, setup the DNS and the email service is out of the scope of this article. Anyway it depends on your providers.
System Requirements
The installer installs all the system dependencies that you need, like MySQL, Redis, etcetera. You only need a fresh Ubuntu server using one of these versions:
- Ubuntu 22.04 LTS (Jammy Jellyfish).
- Ubuntu 20.04 LTS (Focal Fossa)
Information needed
During the installation process you will need to respond to some questions. The following are the main values you will have to provide:
Droplet:
- Root password.
- Hostname:
unit3d-demo.
Postmark (sign up):
- Username.
- Email.
- Password.
UNIT3D Platform Owner:
- Username: We used
unit3d-owner. - Email.
- Password.
MySQL:
- Root password.
- UNIT3D user: username (
unit3d) and password.
SMTP Configuration:
- Driver: smtp.
- Server:
smtp.postmarkapp.com. - Port:
587. - Username: A token provided by postmarkapp.
- Password: Same as username.
TMDB (themoviedb.org, a service to get metadata about movies):
- API key.
Used Versions:
- OS: Ubuntu 22.04 LTS (Jammy Jellyfish)
- PHP: 8.3.10
- Database: 8.0.39-0ubuntu0.22.04.1
- Laravel: 11.5.0
- UNIT3D Community Edition: v8.1.3
- Installation dir:
/var/www/html
Let’s install the software step by step.
Step 1. Create the Droplet in Digital Ocean
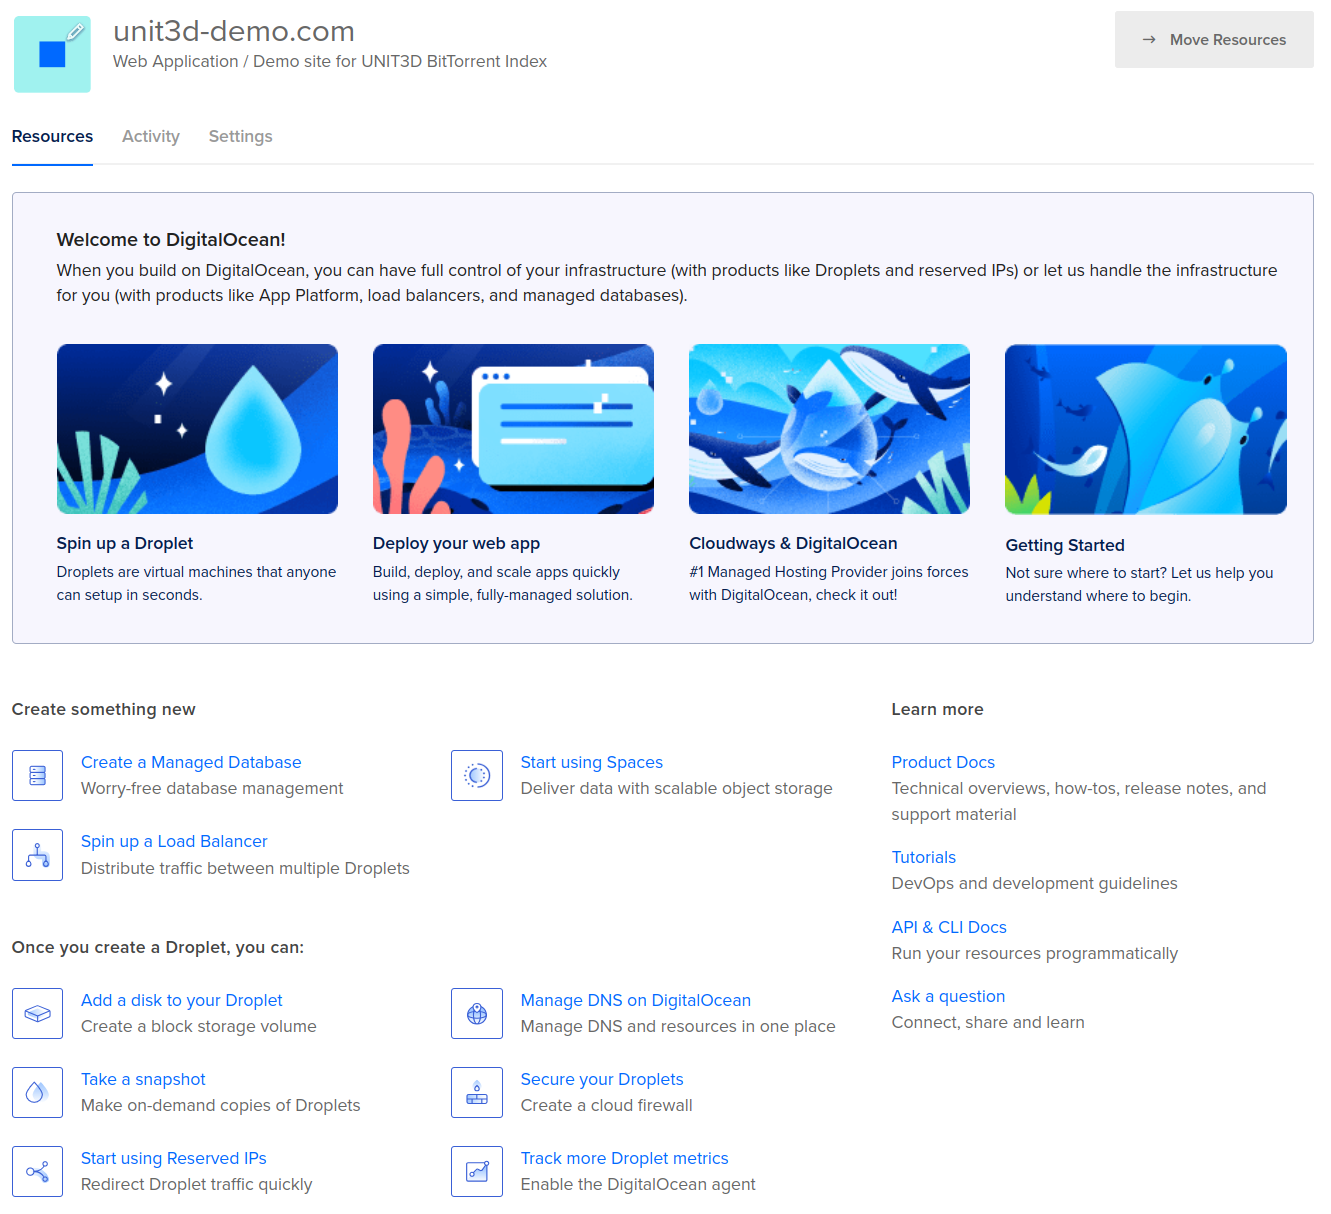
We decided to create a new project so we can assign resources to this project:
And this is the droplet configuration.
Before continuing with the tutorial make sure your root domain and www subdomain are pointing to the droplet’s IP.
ping unit3d-demo.com
PING unit3d-demo.com (134.122.65.71) 56(84) bytes of data.

ping <www.unit3d-demo.com>
PING unit3d-demo.com (134.122.65.71) 56(84) bytes of data.
Also, check that you can login using SSH:
ssh root@134.122.65.71Step 2. Update the Server
This is only a recommendation before running the installer.
sudo apt-get update
Hit:1 http://mirrors.digitalocean.com/ubuntu jammy InRelease
Hit:2 https://repos.insights.digitalocean.com/apt/do-agent main InRelease
Hit:3 http://mirrors.digitalocean.com/ubuntu jammy-updates InRelease
Hit:4 https://repos-droplet.digitalocean.com/apt/droplet-agent main InRelease
Hit:5 http://mirrors.digitalocean.com/ubuntu jammy-backports InRelease
Hit:6 http://security.ubuntu.com/ubuntu jammy-security InRelease
Reading package lists... DoneStep 3. Run the UNIT3D Installer
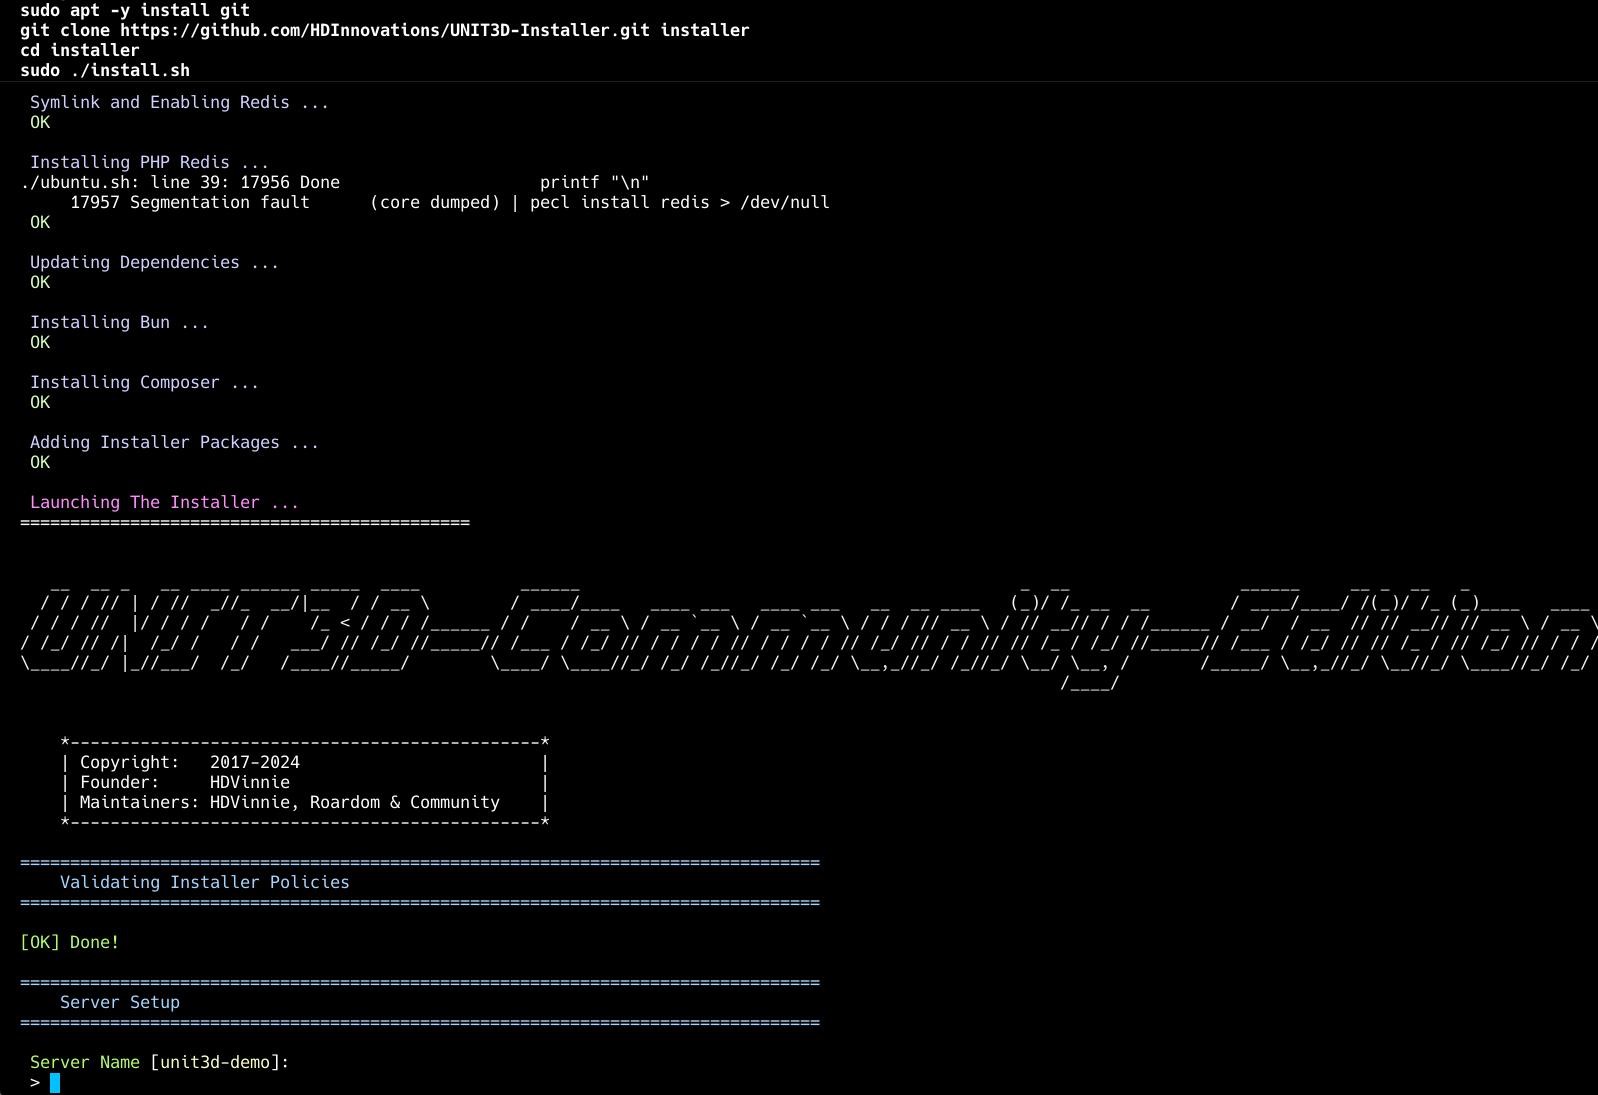
sudo apt -y install git
git clone https://github.com/HDInnovations/UNIT3D-Installer.git installer
cd installer
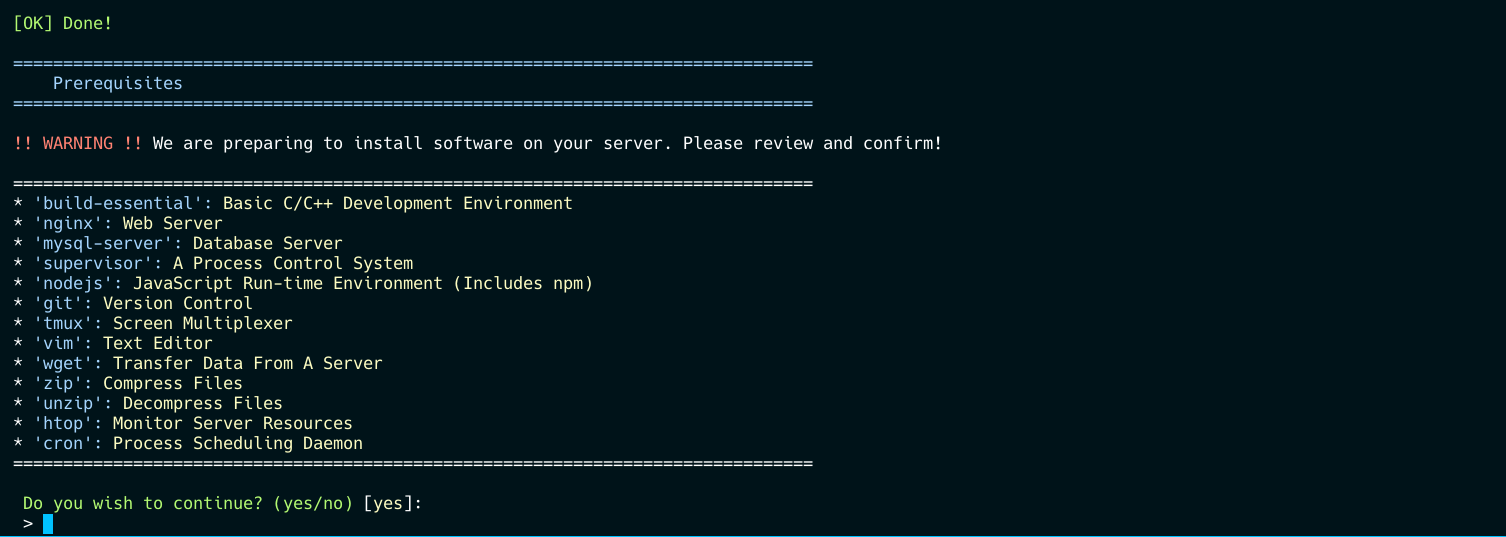
sudo ./install.shThe installer has some steps:
- Validate Installer Policies
- Server Setup
- Prerequisites
- Database Setup
- Php Setup (PHP & PHP-FPM Configuration)
- Nginx Setup (Nginx Setup & Configurations)
- Unit3d Setup (UNIT3D-Community-Edition Settings and Configuration)
First, an assistant will run some checks and it will ask your preferences:
All settings are really easy, specially if you already have all the tokes and password for integrations with external services. When you finish the initial questionnaire you will reach the following confirmation point:
Step 4. Login Page
That’s it. If all went fine during the installation you can load the login page:
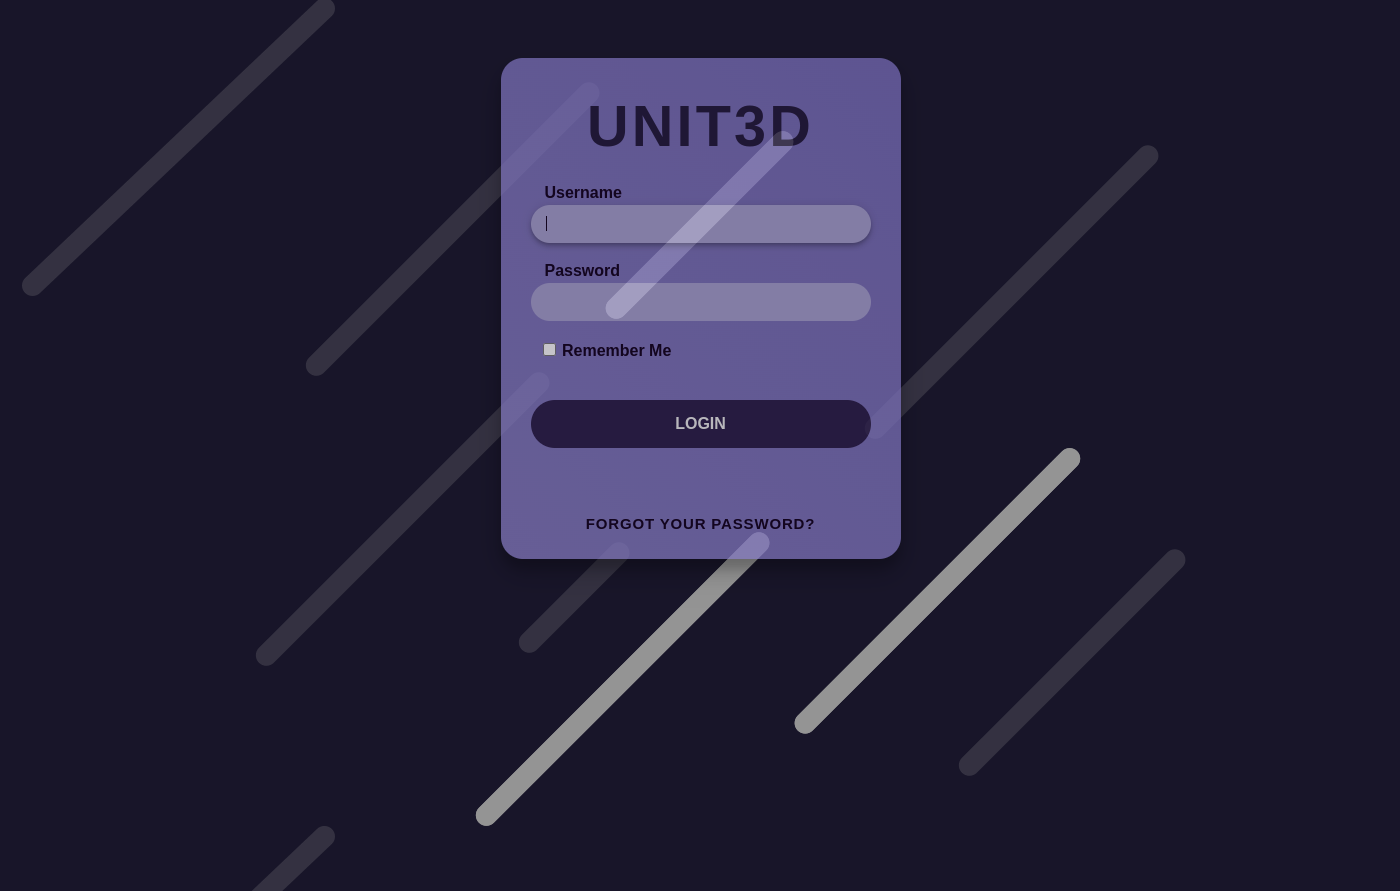
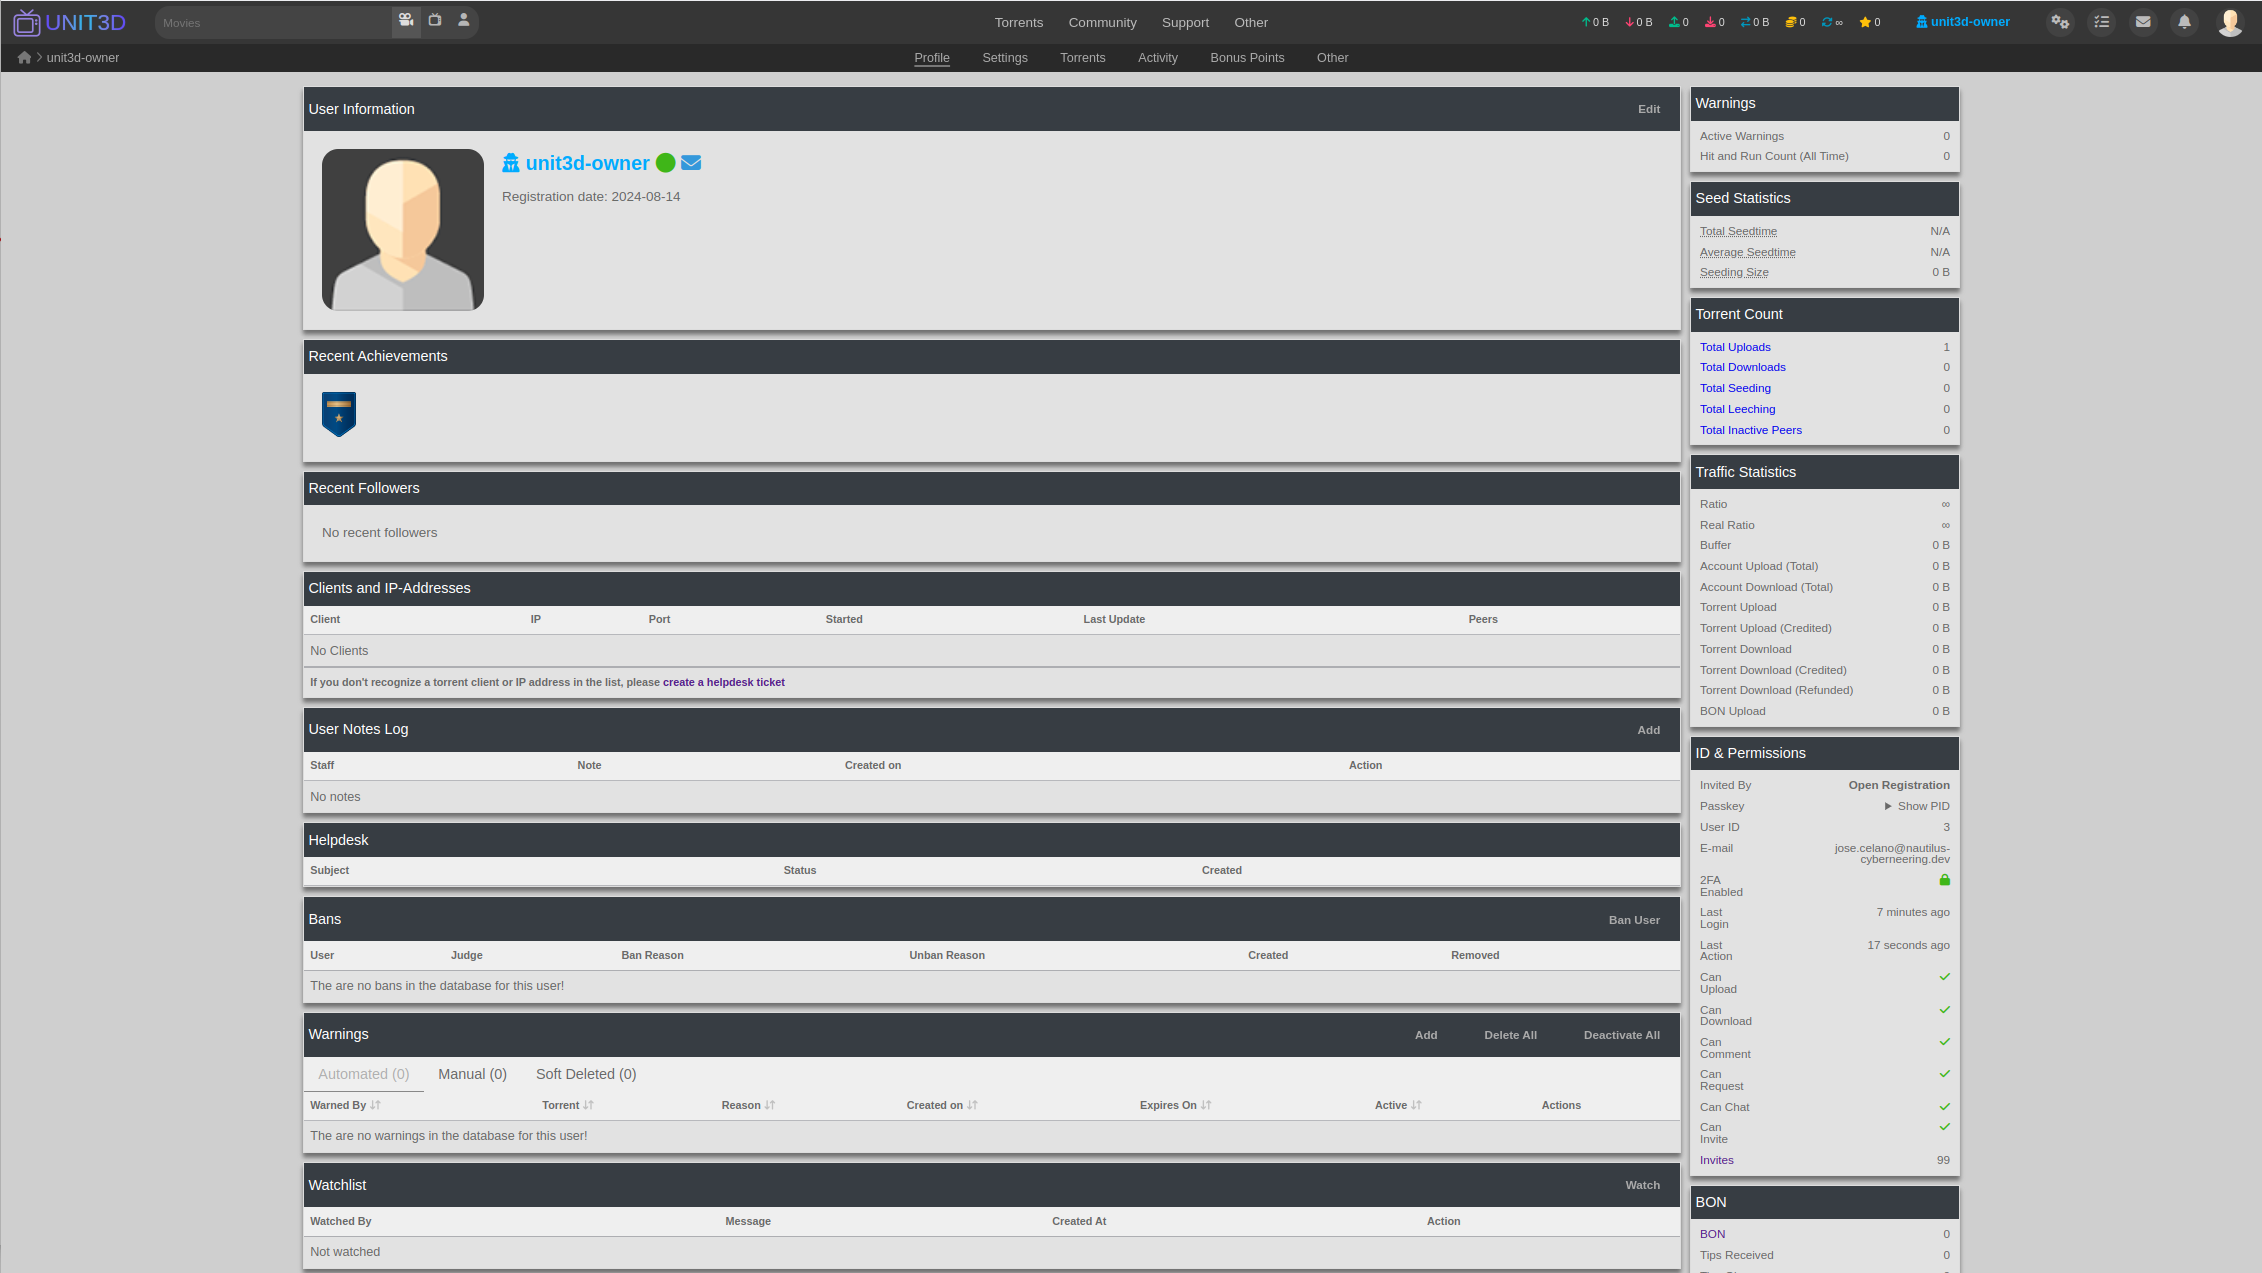
You can use the owner account credentials you provided during the installation.
If the official demo is down you can apply for signing up in our demo on: https://www.unit3d-demo.com/application. You don’t need to provide real data, just a valid email so we can confirm it manually. We want to highlight, however, that we may shut down this demo at any time.
Troubleshooting
During the installation we had a couple of issues.
First, we chose to use HTTPs but the domain was not pointing the droplet’s IP. The generation of the Let’s Encrypt certificates with certbot failed because it was not able to reach the server to check the challenge. Once we fixed the DNS we could not continue on that point because other steps like inserting some values in the database failed. The installation process does not allow to go back or reset to the initial state. We needed to create a new droplet.
Second, the initial server was too small and it stuck at building the frontend app. We got this error:
[Warning] $ vite build
error: script "build" was terminated by signal SIGKILL (Forced Quit)
Killed
The problem was solved by increasing the droplet size. Anyway, It was too small to host all the services UNIT3D requires. Currently, with no users, the CPU Usage is at almost 30% using a 1 vCPU; 2GB RAM instance.
Finally, we also saw a warning in the Laravel logs.
Base table or view not found: 1146 Table 'unit3d.torrents'We opened an issue. However, we checked it and the table was there and the application seems to work fine.
User Interface
After installing the application, we were using it for a while. We:
- Uploaded a torrent.
- Tried to send an invitation.
The application has a lot of features and it can be a little bit overwhelming the first time you use it, specially if you are not used to the BitTorrent index terminology. We could not send an invitation even with the owner account because you need to give some points to the account to enable the user to send invitations. Without a basic knowledge about the common features in indexes it can be tough to understand what some features are or how to customize the index to your needs. Fortunately the maintainers offer install and tuning services.
Conclusion
UNIT3D stands out as a fully-featured BitTorrent index, offering a wide array of functionalities that cater to both developers and community moderators. Its robust codebase and ease of installation are significant advantages, though newcomers may find the platform’s complexity daunting. The lack of extensive documentation on best practices within the BitTorrent community is a challenge, but with support from active maintainers, users can still achieve a high level of customization and control.